Table of Contents
Unmoderated Studies (Beta)
 Updated
by Billy Dowell
Updated
by Billy Dowell
Using Unmoderated Studies
Need to conduct some unmoderated research?
Let's get you started!
Study Creation
First things first, you have to draft a study and get it ready to publish.

Create the Study
- Click New study + at the top of the left sidebar menu. OR click New study in the top right corner, if in the Studies page.
- Select Unmoderated Study (Beta).
- Name your study, via the Study title.
- By default, you will see the name as "Untitled study type (current date)"
- Optional: Change the study owner if you are creating this study on behalf of another team member by clicking on the Add Collaborator icon to the right of the study title.
Set the Plan
- Optional: Add a description for the Research goal.
- Set your Participant limit (how many total people you want to participate in your survey).
- Set the amount of time that participants should expect to spend on the task.
- Leave the incentive toggled on if you want to offer an incentive. If not, flip the toggle off.
- Choose your incentive method.
- By default, you will see that Money or gift card is selected.
- Update the value that you want EACH participant to receive, if using Money or gift card.
- Your total funds required will be shown at the Review page.
- Chose whether you want to fund the study Through Great Question or Outside of Great Question.
- If choosing something other than Money or gift card, follow the prompts that are now shown.
- Choose your incentive method.
- Leave the Screener toggle off if no screener is necessary. If you do want a screener, flip the toggle on.
- Toggling the Screener on and off does add or remove a tab called Screener, just before the Calendar tab. More on screeners here.
- Select your preferred Consent form option.
- Optional: Click on Show additional setup to see more settings, such as:
- Custom study attributes: More on study attributes here.
- Participant experience language to change the proffered language.
- Click Next.
Create the Test questions
- Start by noticing that there is a Recorded Zone.
- The recorded zone is where your participants will be required to use the recording tool, which is Loom.
- Loom does NOT need to be downloaded by the participant.
- Loom only works in Chrome, Edge, and Brave, at this time. The preview, as well as the test, must be checked in one of these browsers.
- Next, review and update your welcome message/informational message, if needed.
- Update the prototype question with your link and Tasks.
- Tasks let your participant know what steps to take and must be completed before moving on to the next task.
- Add more questions (optional) by clicking on the + under the recorded zone and arrange them in an order that you prefer.
- Questions can be rearranged inside and outside the recorded zone.
- Decide the type of answers and create the answers. *Example: “Do you like donuts?” would be a Yes/No question. “What type of donuts do you like?” could be Multi Select, where answers would need to be typed out for the participant, or could be Short Text, which allows the participant to type their own answer.
- Decide if you want the question to be required, to prevent the participant from skipping the question.
- Click Attribute and select/create an attribute if you want their reply to be created as an attribute value (optional).
- To duplicate the question, click on the duplicate icon next to Required.
- To add more questions, click on the + under the first/previous question.
- Add any skip logic that you want to use in order to determine what questions the participant sees based on a previous answer.
- Question templates can also be viewed and used by clicking on the templates icon in the top right corner, just under the Review tab (depending on screen size).
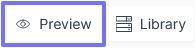
- Optional: Preview your study by clicking on Preview, in the top right corner, next to Library.
- Reminder that Loom only works in Chrome, Edge, and Brave, at this time. The preview, as well as the test, must be checked in one of these browsers.
Review
- Review the details of your study. You should see all green checkmarks.
- If you added an incentive but did not use Money or gift card, you will not see any incentive details to review.
- If you added an incentive, used Money or gift card, and chose Outside of Great Question, you will not see any incentive details to review.
- If you added an incentive, used Money or gift card, and chose Through Great Question, you will see the amount of funds needed for the study.
- If a step does not have a green checkmark, click on the edit icon to go back to that step's page and make the required updates.
- Once everything is all green, click Create or Create & Fund $$$.
- If you are funding your incentives through Great Question, you will be prompted to select a funding method and add funds.
- Done! Study Published! 🙌
Post Publish Features
Once your study has been published, you will see a few more features to review.
Sections below are in the order of the menu options within the study, and image below.
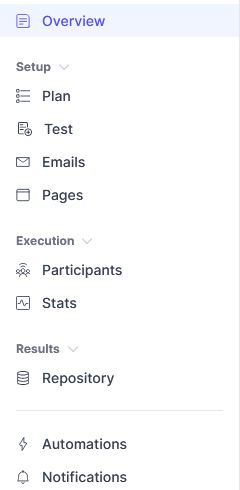
Overview
To make notes and recording research findings about your study, you can use the Report tab.
- Changes are automatically saved.
Plan
Similar to the plan during the drafting phase above.
- Offer an incentive is the only option that cannot be changed once invitations have been sent to participants.
- To manage incentives before invitation are sent:
- If you are already in the Plan, click Manage incentives under Incentives.
- You can also click on Incentives on the left-side menu, if you are not already in the Plan.
- Click Edit and update the incentive options as needed.
- Click Save.
- Review details in the popup modal and select the funding method.
- Click Confirm.
- If you are already in the Plan, click Manage incentives under Incentives.
Screener
If you need to review or edit your screener, you can make any changes in the Screener tab.
- If you decide to add a screener later, toggle on the screener option in the Plan tab.
Test
If you need to review or edit your test, you can make any changes in the Test tab.
To make edits, just start making changes as needed. All changes are saved automatically and noted by a green popup.
- Optional: Preview your study by clicking on Preview, in the top right corner, next to Library.
- Loom (used to record) only works in Chrome, Edge, and Brave, at this time. The preview, as well as the test, must be checked in one of these browsers.
There are sub-tabs here as well, based on a couple of things:
- Possible options are: (* notes default options shown)
- Questions*: houses all screener questions
- Summary*: results of participants responses
- Individual: individual participant responses (shown as participants submit screeners)
Emails
This is where all of your study's emails live, and is where you can preview and edit them.
Updates to the study email templates do not change the templates that are saved in the Email templates page.
Each email has the option to be changed from Branded HTML Layout to Rich Text Format (RTF) via the Email Design dropdown.
- At this time, this must be done for each email type, per study. There is no bulk option for all emails on a study, and no bulk option to apply across all studies for the account.
- The Email Design can also be changed per email as you are getting ready to send, vs changing the study's default.
Pages
Similar to the Review step above, you can review and edit your landing and scheduling pages.
Participants
This is where you will be able to add candidates to your shortlist, manage your participants, and track their progress.
- The Participants tab is your default landing space when opening a study, but you can also get back to it by clicking on Participants.
- To start, you can add candidates to your shortlist via the three options that are shown.
- Or by using Participant Segments.
- The sub-tabs you see indicate what stage the participant is at.
- Possible options are: Shortlisted, Invited, Completed, Started, and Removed.
- Removed shows only when a participant has been removed.
Stats
Review your study's email stats and performance. More information on this feature in our Recruitment Email Statistics guide.
Repository
This is the study level repository. Review your study's insights and survey responses that are specific to the study you are viewing.
- Each can be viewed by their respective subtab.
- Be default, you'll see Insights. Use this page to create and view any insights for this study.
- Use the Search, Filter, and View options to narrow down your results, and change how they are displayed and sorted.
- Click on New to create a new insight.
- Click on Summary responses to see a summary of participant responses to the test.
- Click on Individual responses to see each participant's responses.
- All of this data can also be found in the full Repository.
Use the Export to CSV button, shown on the two responses pages, to export your participants' survey response data into a CSV file.
Automations
Review the different options that you want to automatically happen, such as sending a reminder for a participant to complete their task.
Notifications
Review the different notification options that you would like to receive via email
- Some notifications only show depending on enabled settings, such as incentives and screeners.
Have Questions?
Please reach out to us in the chat or at support@greatquestion.co!