

What is the Studies page?
The Studies page lists the studies in your workspace, and each team has its own studies page for its studies. A new version of the page is rolling out alongside the classic one. It shows every study as a row in one table, and you decide which columns appear, in what order, and how they’re sorted. Filters, search, and column setups can be saved as views, so you can come back to the same list in one click. Each person chooses for themselves whether to use the new version. Switching doesn’t change anything for anyone else in your workspace, and you can go back to the classic page at any time.The new Studies page is rolling out gradually. If you don’t see Try the new studies page next to the Studies title, it isn’t available on your account yet.
Why it matters
Set up the table your way. Show the columns you care about, drag them into the order you want, resize them, and freeze the ones you need to keep in view. Keep the setup you use. Save your filters, search, columns, and sort as a view, then share it with your workspace or keep it to yourself. Find studies faster. Combine filters across owners, people, participants, incentives, dates, and custom fields, and choose whether a study has to match all of them or any of them. Act on many studies at once. Select studies and change their owner, team, or status, archive them, or delete them in one step.Common use cases
How to try the new Studies page
- Go to Studies.
- Click Try the new studies page next to the Studies title.
- A welcome message explains what’s new. Click Got it to start using the page.
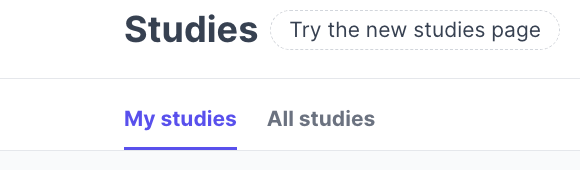
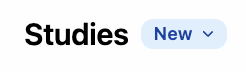
The Try the new studies page option only appears on the main Studies page, not on a team’s studies page. Once you switch, team studies pages use the new table too.
Switch back to the classic page
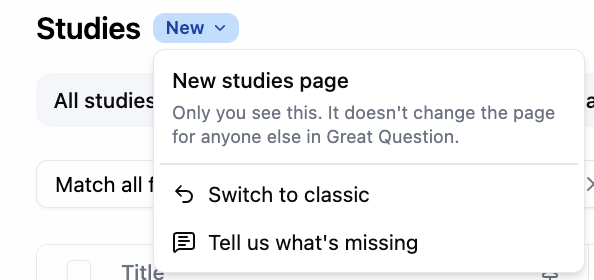
- Click the New badge next to the Studies title.
- Select Switch to classic.
- Optionally, tell us what made you switch back, then click Switch back.
What carries over from the classic page
The first time you open the new page, it picks up the sort, filters, and columns you last used on the classic page in the same browser. A few classic filters don’t carry over, including filters set to match “any” condition. If you haven’t used the classic page in this browser, the new page opens on All studies, sorted by most recently updated. If your workspace has a default on the classic page, the new page uses that default’s tab, sort, and columns instead. For example, if your workspace’s classic default was the My studies tab, the new page opens on My studies too.Finding studies
Search
Click the search icon next to the title, or press Cmd+F (Mac) or Ctrl+F (Windows), and type. Search matches a study’s title, summary, and goal. Press Esc to clear your search.Views
The tabs above the table are views. Every workspace has two built-in views:
Saved views appear as more tabs. Which saved views you see depends on the page you’re on:
A lock icon means the view is personal and only you can see it. A dot on a tab means you’ve changed the view since it was saved. Views you can edit have a ⋯ menu on their tab. Click + at the end of the tab row to create a new view. To see every view, including ones that don’t fit in the tab row, click All views.
Filters
Click the Filter icon in the toolbar, or press F, and pick a field. You can search the list or browse it by group:
People filters list Me first, so you can quickly find studies you own, created, or moderate.
People filters (Owner, Creator, Moderators, and Collaborators) also find people who have been deactivated, so you can still filter down to a former teammate’s studies. Deactivated people are listed after everyone who is still active. You can filter by a deactivated person, but you can’t make them a study’s owner.
Filters with a fixed list of values, such as Status or Research method, offer Select all and Deselect all when you can choose more than one value. Both act on the values your search currently shows. Choosing Deselect all removes the filter. People, Team, and custom field filters don’t offer these options.
If your workspace shows people only the studies of teams they belong to, Creators and Observers only see their own teams in the Team filter. Admins see every team. A saved view filtered to a team you can’t see shows no studies.
Applied filters appear as chips in a row below the view tabs. Click a chip to change it, click + to add another filter, or click Clear all to remove them. When you have two or more filters, choose Match all filters or Match any filter.
Once filters are applied, the Filter icon shows how many there are. Click it, or press F, to show or hide the filter row. When you switch to another view, the filter row is hidden again. Press F to see that view’s filters.
For date filters, a new filter starts on is on or after. You can change it to another option, such as is. Type a date in your browser’s usual format (for example, MM/DD/YYYY), or use is within the last or is older than with a number of days.
Customizing the table
Click the Display icon in the toolbar, or press D, to change how the table looks. Sort by sets the sort column and direction. By default, studies are sorted by Updated, newest first. Show archived studies adds archived studies to the list. Columns lists every available column. Check a column to show it, uncheck it to hide it, or drag it by its handle to reorder. Click a column’s options menu to sort by it, move it, freeze it, or hide it. Reset column widths restores the app’s default column widths. Reset display restores the view’s saved display settings. You can also work with columns directly in the table:- Drag a column header to move it.
- Drag the right edge of a header to resize it, or double-click the edge to fit the column to its content.
- Click a header to open its menu.
Columns
By default, the table shows Title, Status, Research method, Owner, Progress, and Updated. You can add any of these from Display:
Hover over a column title, or press Tab to move to it, to see what the field means.
A few columns are worth knowing about:
Updated and Last activity track different things. Updated changes when the study’s record is saved. Last activity changes whenever a participant changes stage, books, or reschedules. Last activity is blank for studies that haven’t had any of that activity since November 2025.
Progress shows completed participants against the study’s target, for example 3/10. If the study has no target, it shows the number completed, for example 3 completed. Studies that haven’t started show a dash.
Team shows the team the study belongs to, or Workspace if it isn’t affiliated with a team.
Moderators and Collaborators show up to three avatars, then a count of the rest.
Incentive shows the study’s incentive in its own currency. Funding, Paid out, and Recruitment fees are shown in US dollars.
Hover over a study’s title to see a summary card with details that aren’t already in your visible columns, such as its owner, progress, goal, and key dates.
Funding, Paid out, and Recruitment fees are only available to Admins and Creators. Observers don’t see these columns or filters. See User roles and permissions.
Where your setup is saved
Changes you make to filters, search, sort, columns, and column widths are remembered in your current browser. To keep a setup across devices, or to share it, save it to a view. Each view remembers its own unsaved changes. If you change a view and then switch to another one, your changes are kept. When you come back to the view, whether from its tab, a link to it, or by opening the studies page, your changes and the unsaved-changes dot come back too. A view’s remembered changes are cleared when you:- Click Reset
- Click Save to view
- Click Save as new view
- Delete the view
- Your own default view
- The page’s default view, if an Admin has set one
- The view you last used on this page in this browser, with any unsaved changes
- All studies, sorted by most recently updated
Saving views
Save changes to a view
When you change the filters or search, Reset and a Save view menu appear next to the Filter icon:- Save to view updates the view you’re on.
- Save as new view saves your changes as a new view and leaves the original as it was.
Create a new view
- Click + (New view) at the end of the tab row.
- Enter a Name and, optionally, a description.
- Under Who can see it, choose who the view is for:
- On the main Studies page, choose Only me or Everyone.
- On a team’s studies page, choose Only me or the team’s name.
- Click Save.
Only me views appear on every studies page. Views shared with Everyone appear only on the main Studies page, and views shared with a team appear only on that team’s page.
Edit or delete a view
Hover over the view’s tab and click its ⋯ menu. The menu appears only on views you can edit.- Rename view opens the view’s details. You can change the name, description, and who can see it.
- Duplicate view saves a personal copy of the view, with “(copy)” added to its name, and opens it. The copy keeps the same filters and display settings.
- Delete view removes the view after you confirm. Deleting a view never deletes the studies in it.
Set a default view
Click All views, find the view, and select Make default. Admins can also choose Make default for everyone on shared views, so everyone who opens that page lands on the same view. The main Studies page and each team’s studies page have their own default. Your own personal default always takes priority over the page’s.Who can do what with views
You can also manage views from the Manage views link at the bottom of the All views list.
Working with studies
Open a study
Click a row to open the study. Hold Cmd (Mac) or Ctrl (Windows) while clicking to open it in a new tab. Draft studies open in the study builder so you can keep setting them up.Row actions
Click the ⋯ menu at the end of a row, or right-click the row, to see what you can do with that study. Actions the study can’t take right now are greyed out, with the reason next to them. For example:- The study’s status. “Only active studies can be paused.” An active or paused study tells you the next step, such as “This study is active. Close it first, then archive it.”
- Whose study it is. The reason names who can change it, such as the study’s owner, members of its team, or an Admin.
- An action already in progress. “It’s already closing.”
- How the study was made. Some actions aren’t available yet for studies made in the new editor or moderated by AI.
Most actions ask you to confirm and explain what will happen first. For example, pausing a study shows its participant page as closed until you unpause it, and archiving it removes it from the list until you turn on Show archived studies. After pausing or unpausing, you can click Undo in the confirmation message.
Close opens a review before anything changes. It shows what will happen to participants who haven’t finished (mark them completed or cancel them) and where any unused incentive funds will go. Nothing happens until you confirm.
Bulk actions
- Check the box next to each study you want. To select or unselect a range of rows, check one box, then hold Shift and click another. To select every loaded study, check the box in the header. When more studies match than are loaded, the count reads N of M studies selected, for example 50 of 120 studies selected. Click Select all to include every matching study, up to 10,000.
- Click Actions in the toolbar that appears.
- Choose an action. Status actions such as Pause, Close, and Archive are under Change status.
- Review the confirmation or fill in the form, then confirm.
Actions that run in the background
Pause and Change owner can act on up to 10,000 studies at once. When you select more than 100 studies for one of these actions, the action runs in the background:- Select the studies, using Select all to include every study that matches your filters.
- Choose Pause or Change owner. The confirmation shows the number of studies instead of a per-study review, and says the action runs in the background.
- Confirm. Your selection clears, and a progress bar above the table shows what’s running (for example, Pausing 500 studies) and how many are done.
- Keep working while it runs. To stop it, click Cancel next to the progress bar. Studies already changed stay changed.
You can delete or close up to 25 studies at a time. If you select more than 25, you’ll see a message saying so. Select fewer studies and run the action again for the rest.
Team studies pages
Each team’s studies page uses the same table, limited to that team’s studies. Everything above works the same way, except that the Team filter isn’t offered, and New study creates the study in that team. Team pages remember your column setup separately from the main Studies page. Each team page has its own saved views. You see your personal views and the views shared with that team. Views shared with Everyone on the main Studies page don’t appear on team pages. Admins, and Creators who are members of the team, can share views with the team. Only Admins can make a view the default for everyone on the team’s page. To switch back to the classic page, go to the main Studies page and use the New badge there.Best practices
Save the lists you check often. If you look at the same filters every week, such as your active studies or studies waiting on approval, save them as a view instead of rebuilding them each time. Save before you switch devices. Your column setup is remembered in the browser you’re using. Save it to a view if you want the same setup on another computer. Give your workspace a shared starting point. Admins can create a shared view with the columns your team relies on and make it the default for everyone. People can still set their own personal default on top of it. Use Close to settle a study properly. The Close review shows how participants and leftover incentive funds will be handled, so read it before you confirm, especially when closing several studies at once. Tell us what’s missing. If something you rely on in the classic page isn’t here yet, use Tell us what’s missing in the New badge menu, or let us know when you switch back.Troubleshooting
Still need help? Contact us at support@greatquestion.co — median response time is 19 minutes during support hours.