Table of Contents

Importing Candidates

Billy Dowell Updated by Billy Dowell

Import your candidates into Great Question

Need to add multiple candidates to your account? Import them via CSV!

Before you import your file

Review the data in your file to make sure that it is accurate and contains only what you need. Removing excess data and cleaning up your file will help ensure the smoothest import process possible, along as ensuring no unnecessary data is added.

Requirements and tips
  • Must be a CSV file (.csv).
  • Column headers must be the top row in the file.
  • Include valid email addresses.
  • Remove stray characters (e.g. Activated Date instead of ,Activated Date).
  • Remove unescaped quotes (e.g. “NYC” instead of “NYC).
  • Fix misaligned headers.
  • Remove empty rows and columns when possible.
  • Remove duplicate columns and rows.

How to import your file

You can import a CSV file from the Candidates page, or from the study that you are currently working in.

Importing to the Candidates page
Image showing where to select the option to import new candidates via a CSV file from within the Candiates page.
  1. Access the Candidates page via the main left-side menu.
  2. If you do not have any candidates yet, click Add candidates under Build your research panel.
  3. If you already have some candidates, click Add candidates in the top right corner.
  4. Select Import from CSV.
  5. On the new page, click to open your device's file browser, or drag and drop a file into the box.
    1. If you are not seeing your file browser open, please make sure that your browser is up-to-date, and you do not have any permission settings blocking access.
    Image showing the modal that allows users to choose a CSV file to import.
  6. Once a file has been selected, review the data that is shown on the next page under Review import.
    1. Ensure all fields have an attribute selected.
      1. 📢 Great Question does try to automatically pair each field with its matching attribute, but we always recommend reviewing to ensure the correct attribute is selected.
    2. If the attribute does not yet exist for the field that you are importing, type in the name of the new attribute and select "Save this as a new attribute", and fill out the modal that pops up.
      1. You can also click on +Create to the right of Attributes to create a new attribute.
    3. Uncheck any fields that you do not wish to be imported.
    4. Confirm that there are no duplicate attributes applied.
    Image showing the CSV import page where users can review and edit the data before importing.
  7. Review and update the Import settings.
    1. Edit the import name, if needed.
      1. 📢 The file name is used to generate the import name, but we recommend editing this to ensure it is something that is easily recognized and searchable.
    2. Choose whether you want to update existing candidates (default), or if you want to exclude any candidates that already exist.
      1. 📢 Update existing will replace their existing data with the data that is in the file only for the attributes that are in the file. Any other attribute in their profile will not be changed or removed.
    3. Choose your preferred contact access if using the Great Question Teams feature (enabled by request for Enterprise plans).
    4. If you want to shortlist these candidates to a study at the same time, choose a published study (not in the draft state) from the list.
      1. 📢 Candidates that are shortlisted to a study are also added to your database in the Candidates page.
    5. Click More options to review or edit additional features.
      1. Determine which attribute you want to use for the Unique identifier, such as Email, or a custom attribute that has been set as a possible identifier.
        1. 📢 Enabled by request for Enterprise plans. Please reach out to [email protected] for access. More on setting an attribute as a unique identifier here.
      2. Bulk add an attribute and value to all candidates, if needed. The same attribute and value will be applied to all candidates.
      Image showing the CSV import page where users can review and edit the import settings before importing.
  8. Click Review & import in the top right corner.
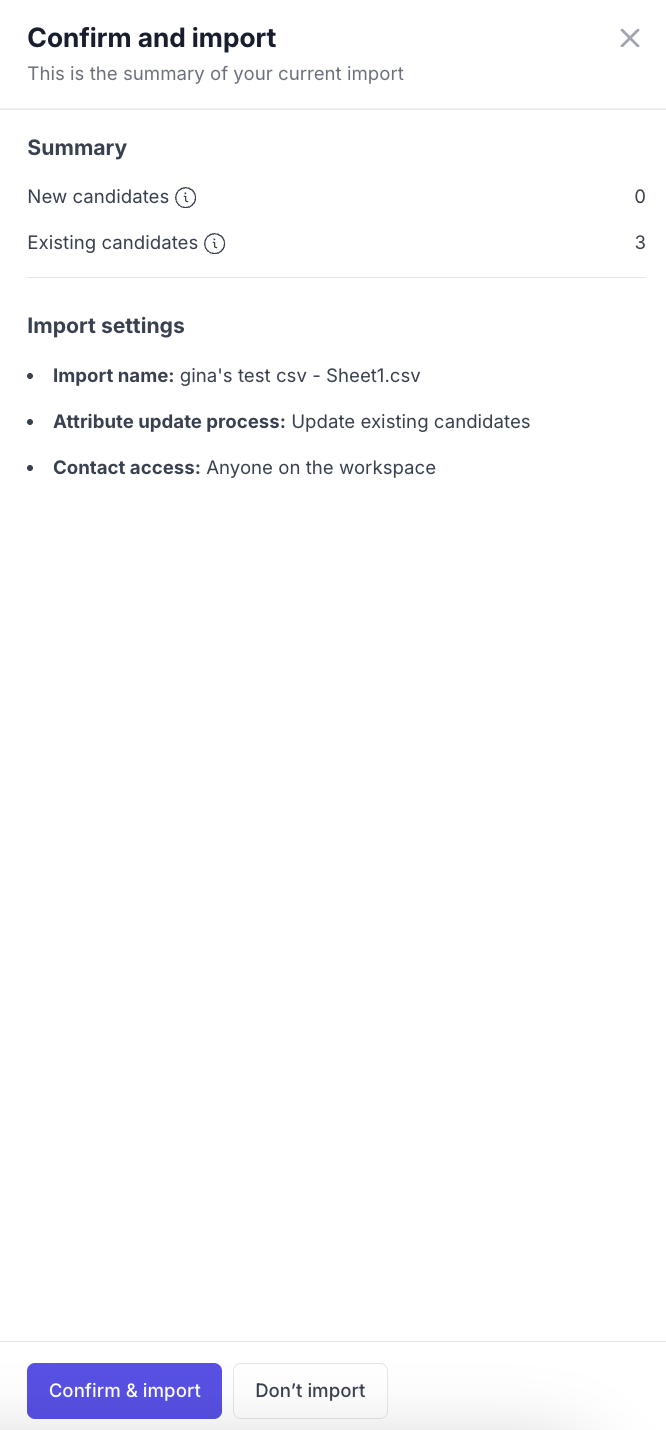
  9. Review the Confirm and import slide out details.
    1. The summary shows the number of new candidates that will be added, as well as the number of existing candidates that will be updated.
    2. The import settings shows and confirms the settings that you set up in the previous page.
  10. Click Confirm & import when ready to complete the process and add the candidates to your database, and study (if shortlisting to a study).
    1. Clicking Don't import only closes slide out. Your progress will not be lost.
    Imaging showing the review page before confirming and importing the CSV file.
  11. A green success message will show, confirming that the import is being completed. Smaller imports will be very quick to process, but some may take a little longer. If your import does take a couple of minutes to process, you will see a yellow message indicating that the import is processing. Once done, the message will go away. An email will also be sent to confirm if your import was successful or not.
    Image showing the successful import email.
Importing to a study
Image showing where to select the option to import new candidates via a CSV file from within the a study.
  1. Open the study that you would like to add candidates to.
  2. If you do not have any candidates yet, click Add candidates under Build your research panel.
  3. If you already have some candidates, click Add candidates in the top right corner.
  4. Select Import from CSV.
  5. On the new page, click to open your device's file browser, or drag and drop a file into the box.
    1. If you are not seeing your file browser open, please make sure that your browser is up-to-date, and you do not have any permission settings blocking access.
      Image showing the modal that allows users to choose a CSV file to import.
  6. Once a file has been selected, review the data that is shown on the next page under Review import.
    1. Ensure all fields have an attribute selected.
      1. 📢 Great Question does try to automatically pair each field with its matching attribute, but we always recommend reviewing to ensure the correct attribute is selected.
    2. If the attribute does not yet exist for the field that you are importing, type in the name of the new attribute and select "Save this as a new attribute", and fill out the modal that pops up.
      1. You can also click on +Create to the right of Attributes to create a new attribute.
    3. Uncheck any fields that you do not wish to be imported.
    4. Confirm that there are no duplicate attributes applied.
      Image showing the CSV import page where users can review and edit the data before importing.
  7. Review and update the Import settings.
    1. Edit the import name, if needed.
      1. 📢 The file name is used to generate the import name, but we recommend editing this to ensure it is something that is easily recognized and searchable.
    2. Choose whether you want to update existing candidates (default), or if you want to exclude any candidates that already exist.
      1. 📢 Update existing will replace their existing data with the data that is in the file only for the attributes that are in the file. Any other attribute in their profile will not be changed or removed.
    3. Choose your preferred contact access if using the Great Question Teams feature (enabled by request for Enterprise plans).
    4. Since you started the import process from with an study, the study will automatically be added for the shortlist option, adding these candidates to the study's shortlist at the same time.
      1. 📢 Candidates that are shortlisted to a study are also added to your database in the Candidates page.
    5. Click More options to review or edit additional features.
      1. Determine which attribute you want to use for the Unique identifier, such as Email, or a custom attribute that has been set as a possible identifier.
        1. 📢 Enabled by request for Enterprise plans. Please reach out to [email protected] for access. More on setting an attribute as a unique identifier here.
      2. Bulk add an attribute and value to all candidates, if needed. The same attribute and value will be applied to all candidates.
        Image showing the CSV import page where users can review and edit the import settings before importing.
  8. Click Review & import in the top right corner.
  9. Review the Confirm and import slide out details.
    1. The summary shows the number of new candidates that will be added, as well as the number of existing candidates that will be updated.
    2. The import settings shows and confirms the settings that you set up in the previous page.
  10. Click Confirm & import when ready to complete the process and add the candidates to your database, and study (if shortlisting to a study).
    1. Clicking Don't import only closes slide out. Your progress will not be lost.
    Imaging showing the review page before confirming and importing the CSV file.
  11. A green success message will show, confirming that the import is being completed. Smaller imports will be very quick to process, but some may take a little longer. If your import does take a couple of minutes to process, you will see a yellow message indicating that the import is processing. Once done, the message will go away. An email will also be sent to confirm if your import was successful or not.
Image showing the successful import email.

FAQ

How long does it take for my file to be imported?

Import processing is generally done within a few minutes, but can fluctuate based on multiple factors, such as file size and internet speeds. If you believe that your import is taking longer than usual, please reach out to support and our team will be happy to review.

There is not a recommended file size, but keeping your file around 10,000 rows would be best. Depending on how much data you are trying to import, columns + rows, your file may take longer than usual. 10,000 rows will help ensure that your file does not take too long. If your file contains more than 10,000 rows, we recommend splitting it up and importing each set separately.

Why am I not seeing the candidates in my shortlist?

If you imported candidates to a study and are not seeing them in the shortlist, the candidates may already exist within your study and are under different lists, such as the invited or scheduled lists.

Use the search feature for your participants table and search by their name or email. If they already exist, you should see them under one of the other lists.

If you are still not seeing your imported candidates in your study, please reach out to support and our team will be happy to take a look.

Have Questions?

Please reach out to us in the chat or at [email protected]!

How did we do?

Candidate Attributes

How do I search for a candidate?

Contact