Table of Contents
Focus Groups
 Updated
by Billy Dowell
Updated
by Billy Dowell
Using Focus Groups
Need to speak directly with multiple candidates? Focus Groups are the way to go.
This feature also does not have a study level repository, meaning recorded videos will not be uploaded to the study at this time.
Study Creation
First things first, you have to draft a study and get it ready to publish.

Create the Study
- Click New study + at the top of the left sidebar menu. OR click New study in the top right corner, if in the Studies page.
- Select Focus Groups.
Set the Plan
- Name your study via the Study title.
- By default, you will see the title as "Untitled study type (current date)"
- Optional: Change the study owner if you are creating this study on behalf of another team member by clicking on the Add Collaborator icon to the right of the study title.
- Optional: Add a description for the Research goal.
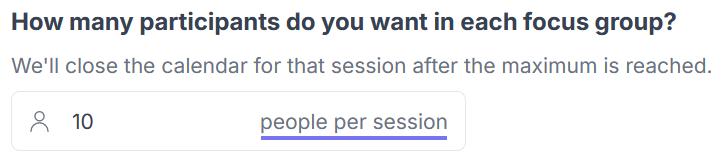
- Set your Participant limit (how many total people you want to talk to per session).
- Toggle on the Recruit external candidates BETA feature if you want to recruit participants outside your panel. If not, leave the toggle off.
- Toggling this feature on or off does add or remove a tab called Recruiting, at the top, and automatically enables the Incentives and Screener toggles.
- When Incentives are enabled, the minimum inventive amount is set to $5, which is required by Respondent.
- Check out our External Participant Recruitment guide for more information on this feature and how to set it up.
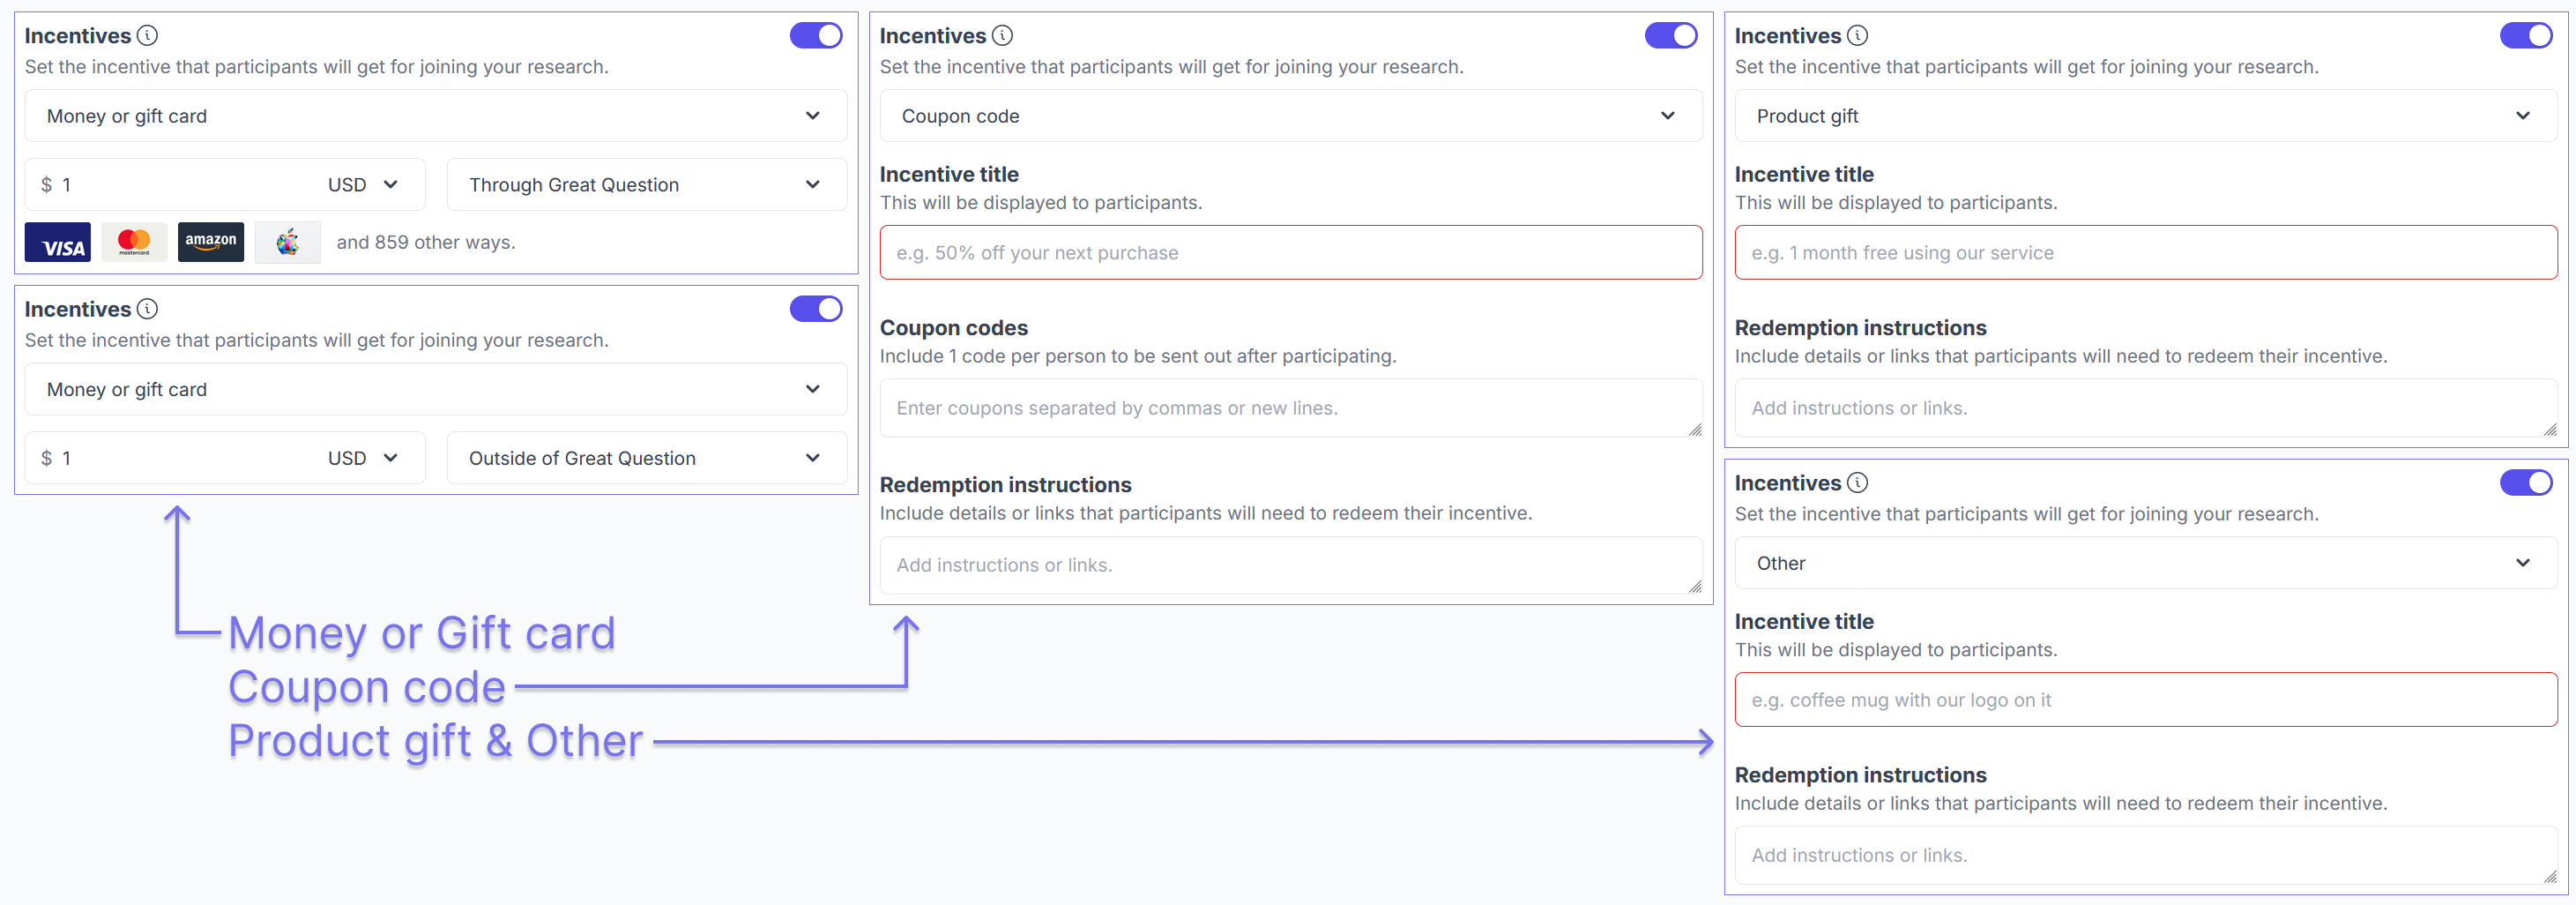
- Leave the incentive toggled on if you want to offer an incentive. If not, flip the toggle off.
- Choose your incentive method.
- By default, you will see that Money or gift card is selected.
- Update the value that you want EACH participant to receive, if using Money or gift card.
- Your total funds required will be shown on the Review page.
- More on that step below.
- Choose whether you want to fund the study Through Great Question or Outside of Great Question.
- We partner with Tremendous to send incentives. To see what options are available for your participants, you can review Tremendous' catalog, searching by gift type, country, or currency.
- If choosing something other than Money or gift card, follow the prompts that are now shown.
- Choose your incentive method.
- Leave the Screener toggle off if no screener is necessary. If you do want a screener, flip the toggle on.
- Toggling the screener on or off does add or remove a tab called Screener, at the top. More on screeners below.
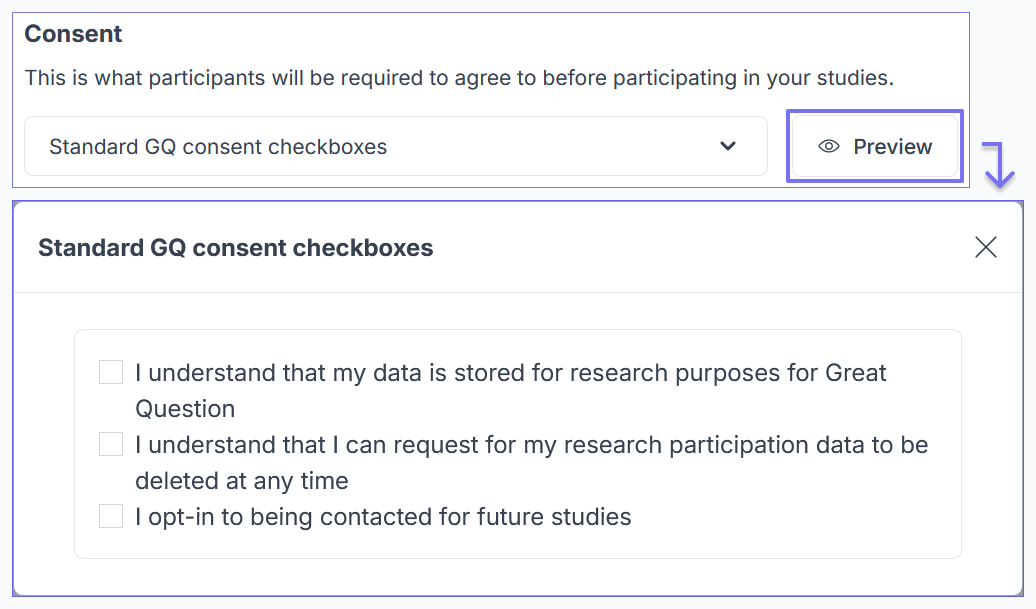
- Select your preferred Consent form option.
- User the Preview button to see what your participants will see, based on the selected consent form option.
- Optional: Click on Show additional setup to see more settings, such as:
- Custom study attributes: More on study attributes here.
- Participant experience language to change the preferred language.
- Click Next.
Create the Screener questions
- Start by deciding the type of question/answers, and typing up your first question.
- Example: “Do you like donuts?” would most likely be a Yes/No question. “What type of donuts do you like?” could be Multi Select, where answers would need to be typed out, or could be Short Text, which allows the participant to type their answer.
- Changing the question type will not affect your typed out question, but can affect your typed out answer choices.
- Then create the answers, if needed.
- If you want the question to be required, to prevent the participant from skipping the question, toggle on the Required option at the top right of the question.
- Click Attribute and select/create an attribute if you want their reply to be created as an attribute value that will get added to their profile.
- More on candidate attributes here.

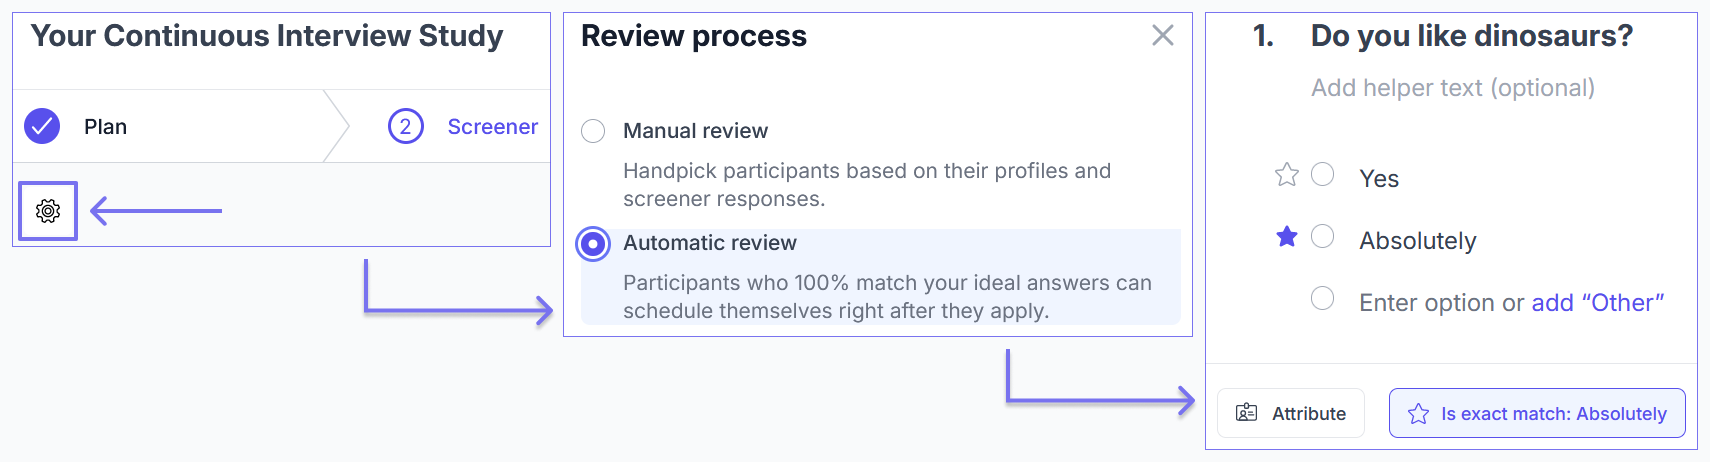
- Click Ideal answer to select what the ideal answer should be.
- Click on the dropdown in the new modal, and choose Is exact match (default), Contains any of, contains all of, contains none of, etc...
- Options shown are dependent on the question type used.
- Select the answer(s) that you want to be your ideal answers by checking the box or clicking the radio button.
- Click Save.
- You can also click on the star next to the answer choice(s) when using Yes/No, Multi Select, or Single Select.
- This option uses the Is exact match setting as the default. To change, click on Ideal answer, make the change, and click Save.
- Click on the dropdown in the new modal, and choose Is exact match (default), Contains any of, contains all of, contains none of, etc...

- To duplicate the question, click on the Duplicate icon next to Required.
- To add more questions, click on the + under the first/previous question.
- To rearrange questions, click on the ⁝⁝ button in the top left of any question and drag and drop in the desired order.
- Click Skip logic to apply skip logic to each question, as needed.
- See Skip Logic and how to use it, for more details and steps.

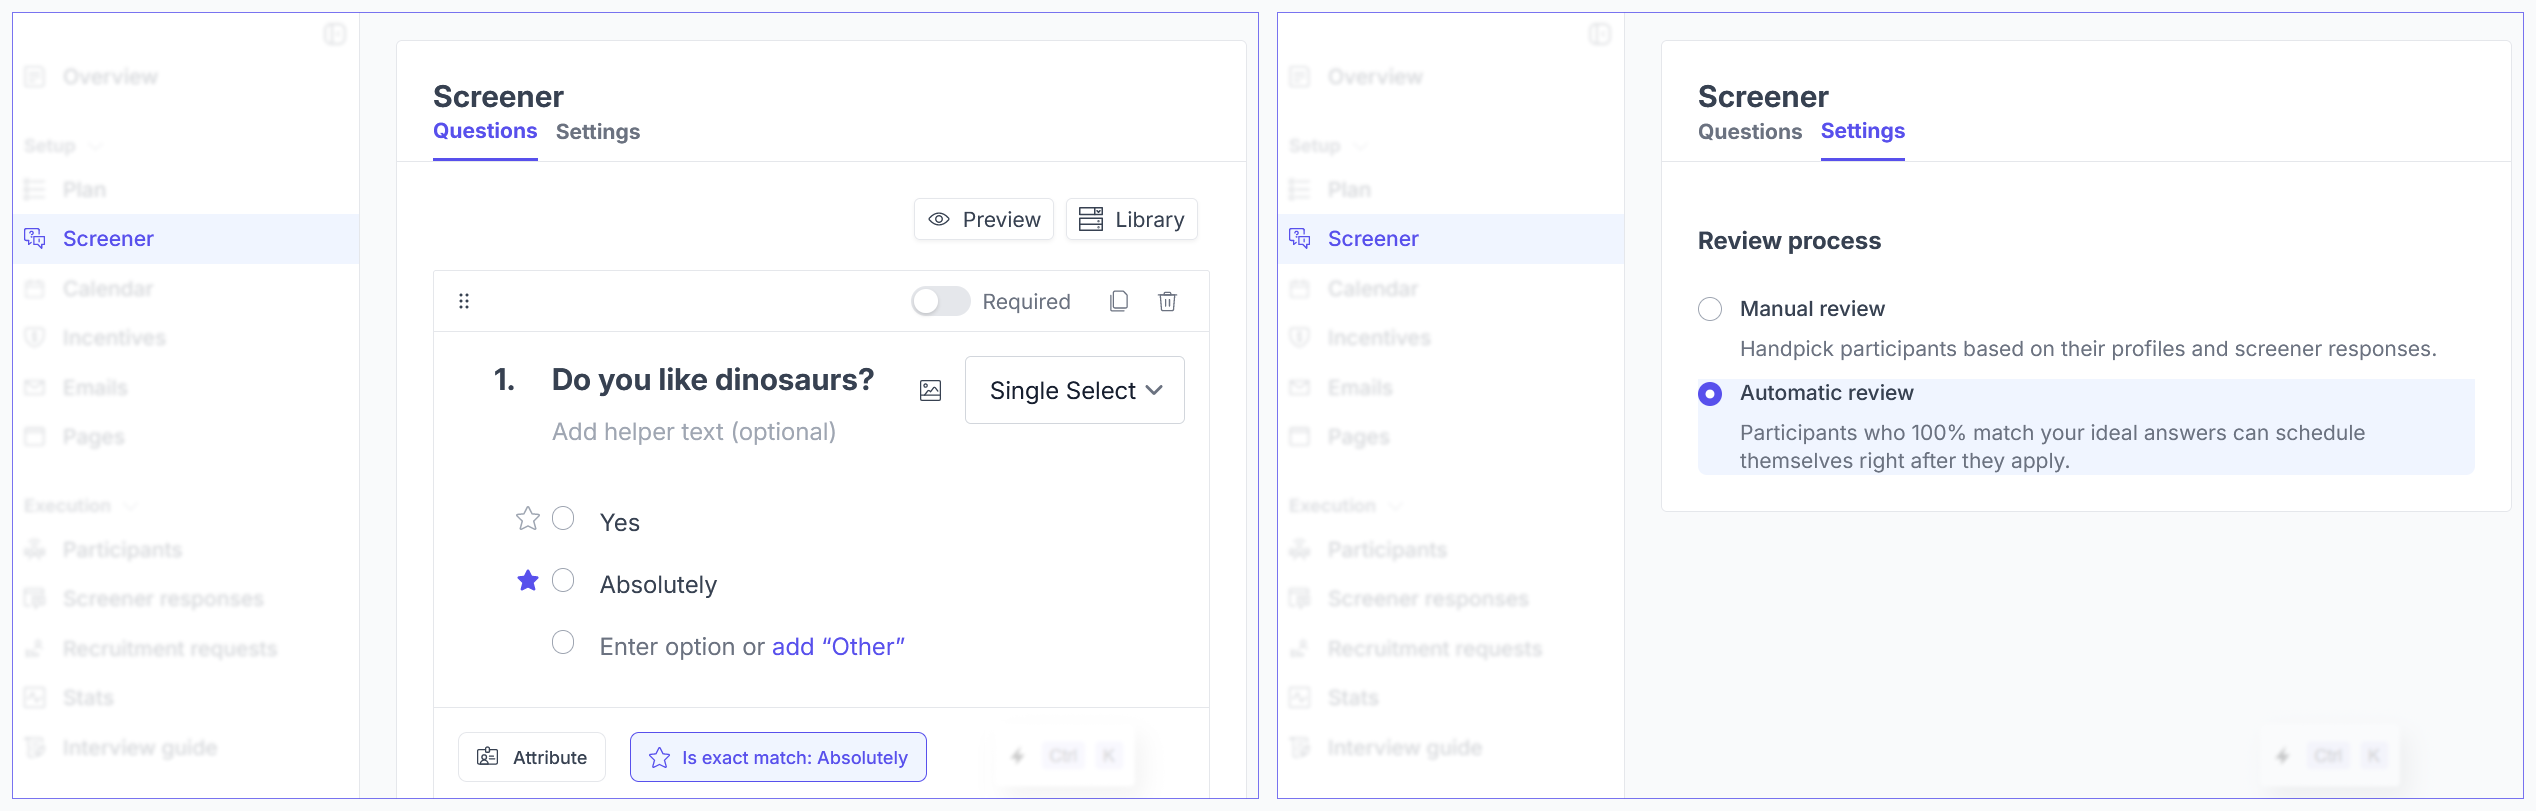
- Click on the Gear icon and select Manual review or Automatic review.
- Ideal answers must be selected in order for Automatic review to work.
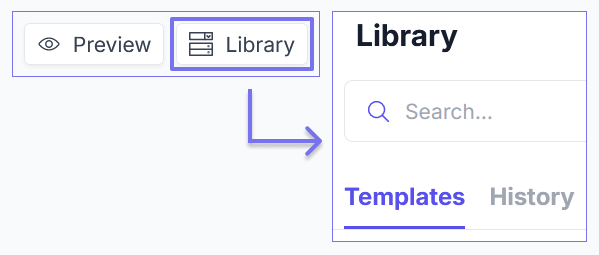
- Question templates, or previously used questions, can also be viewed and used by clicking on Library in the top right corner, just under the Review tab (depending on screen size), and selecting the respective tab in the Library slideout.
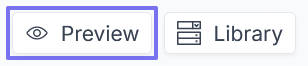
- Optional: Preview your screener by clicking on Preview, in the top-right corner, next to Library.
- Testing your screener from the preview will not submit anything to your study.
Adjust your Calendar
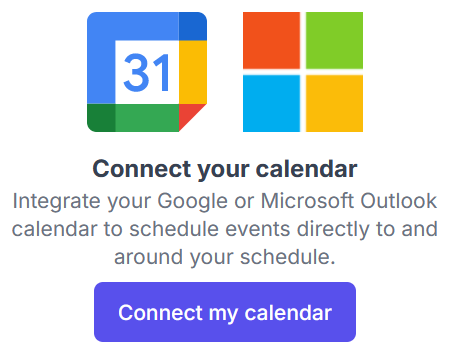
- If you have not integrated your calendar, you will be prompted to do so.
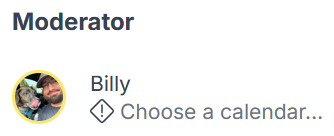
- Review Moderator. Ensure there is no warning indicator, noting that a calendar needs to be selected.
- If there is, click on the warning and select the calendar you want to use.
- Optional: Add any observers to the Observers list.
- Live Stream is not an option for this study type at this time.
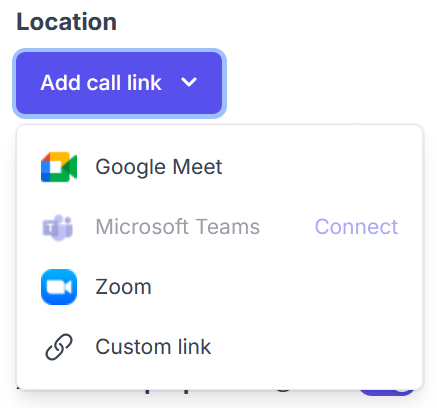
- Location. Location. Location. Set your location by selecting your meeting preference.
- If you want to use Zoom, and have not already connected your account, you can connect your account first, and it will then become your default selection.
- If you want to use Webex, click connect and follow the instructions.
- If using Google, Google Meet will be shown as an actionable option.
- If using Microsoft, with a business email (Microsoft Office 365), Microsoft Teams will show as an option if connected.
- Microsoft Teams requires additional approval and setup. Please follow the steps in the linked Microsoft Teams guide above to connect.
- Microsoft Teams requires additional approval and setup. Please follow the steps in the linked Microsoft Teams guide above to connect.
- If using In person, type in the name of the location that you want meet with your participants and select an option from the dropdown.
- If the location you typed does not return any results, you can still type out the address, but the location in the calendar event may work with the maps provider your participant is using. It is recommended to include instructions in the field below in this case.
- You can also add further instructions to help your participant know what to do when they get to the location provided.
- Choose your duration. The default is 30 minutes.
- If choosing Custom, type in the number of minutes you want the duration to be. Changes are saved once clicking out of the text field.
- Set your first session's date and time.
- If you want to add another session, click on the Add session button, and repeat the process until you have your desired amount of sessions.

- Set your availability within the calendar. Use the buttons to select default times, or set your own. To set time blocks as nonrecurring, click on the block and uncheck Apply for every *day.
- Be sure to check the time zone. If you are creating the study for another user on your team, be sure to set the time zone to the same as the moderator's.
- Click Preview if you want to see an example of what the candidates will see.
- Once things look good, click Next.
Review
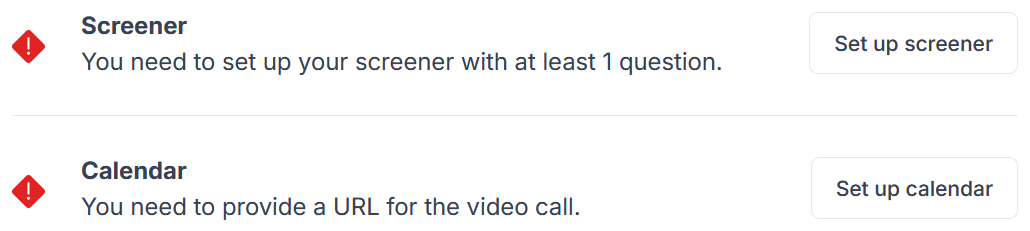
- Review the details of your study. You should see all green checkmarks.
- If you added an incentive but did not use Money or gift card, you will not see any incentive details to review.
- If you added an incentive, used Money or gift card, and chose Outside of Great Question, you will not see any incentive details to review.
- If you added an incentive, used Money or gift card, and chose Through Great Question, you will see the amount of funds needed for the study.
- If a step does not have a green checkmark, review the details as to why, and click on the edit icon to go back to that step's page and make the required updates.
- Once everything is all green, review the incentives budget to confirm everything looks correct, based on the details in the Incentives Budget section.
- Click Create or Create & Fund $$$.
- If you are funding your incentives through Great Question, you will be prompted to select a funding method and add funds.
- Done! Study published! 🙌
Incentives Budget
The incentives budget is calculated by the number of participants you want to talk to, the number of sessions you have, and the total incentive amount per participant.
- Example: If you have a participant limit of 10, 1 session, and an incentive amount of $5, the budget will be $50.
- 10 participants, times the 1 session, times the $5 incentive.
- Example: If you have a participant limit of 10, 3 sessions, and an incentive amount of $5, the budget will be $150.
- 10 participants, times the 3 sessions, times the $5 incentive.
Post Publish Features
Once your study has been published, you will see a few more features to review.
Please also check out our blog post for some great information and best practices: How to set & achieve research goals without a research team.
Sections below are in the order of the menu options within the study and image below.
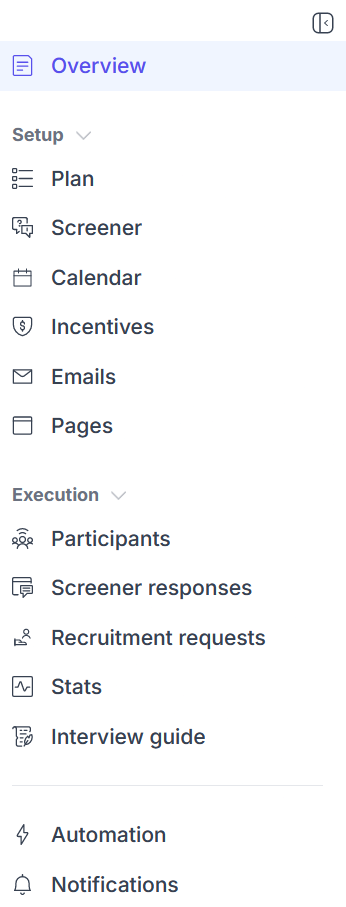
Overview
To make notes and recording research findings about your study, you can use the Overview tab.
- Changes are automatically saved.
Plan
Similar to the plan during the drafting phase above.
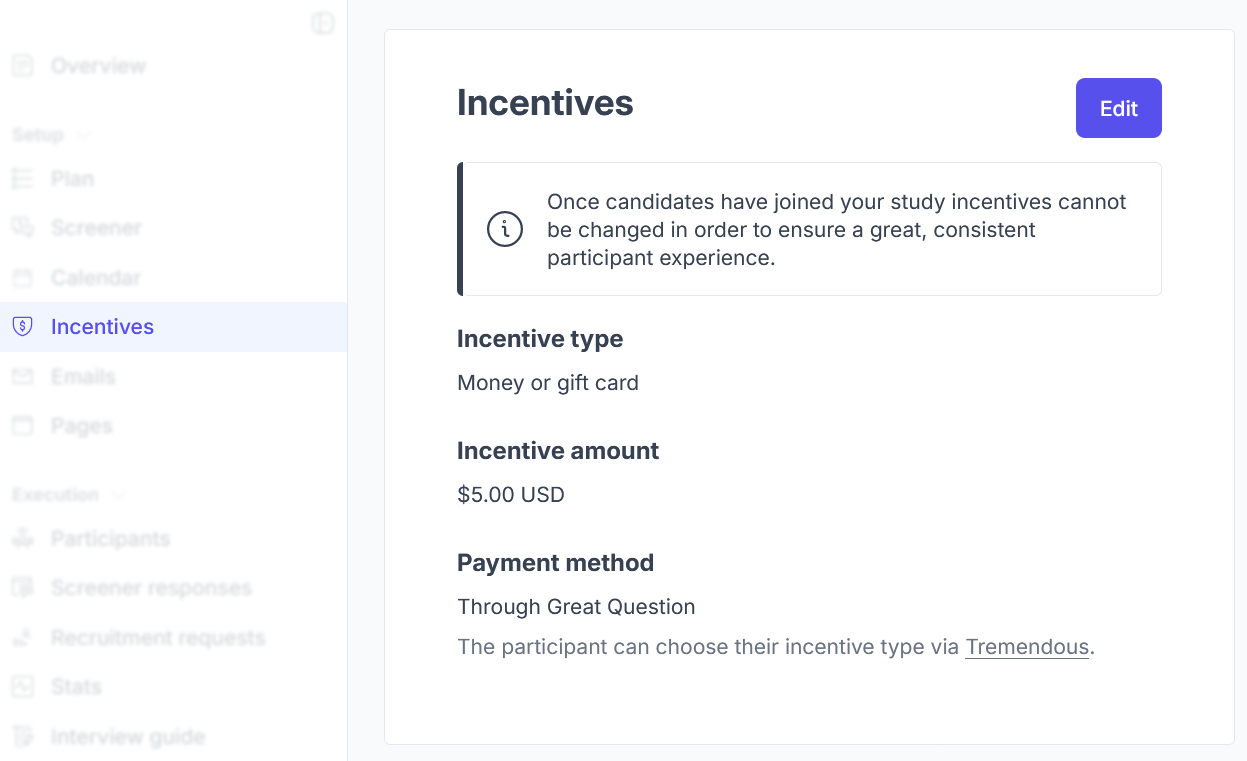
- Offer an incentive is the only option that cannot be changed once invitations have been sent to participants.
- To manage incentives before invitations are sent:
- If you are already in the Plan, click Manage incentives under Incentives.
- You can also click on Incentives on the left-side menu, if you are not already in the Plan.
- Click Edit and update the incentive options as needed.
- Click Save.
- Review details in the popup modal and select the funding method.
- Click Confirm.
- If you are already in the Plan, click Manage incentives under Incentives.
Screener
If you need to review or edit your screener, you can make any changes in the Screener tab.
- If you decide to add a screener later, toggle on the screener option in the Plan tab.
To make edits, just start making changes as needed. All changes are saved automatically and noted by a green popup.
- Reminder: Preview your study by clicking on Preview, in the top right corner, next to Library.
You may see up to two sub-tabs here:
- Possible options are:
- Questions: houses all screener questions
- Settings: option to choose manual or automatic review once an ideal answer has been selected
Button layout may be different depending on screen and window size
See Screener Responses below to see where to find the screener data.
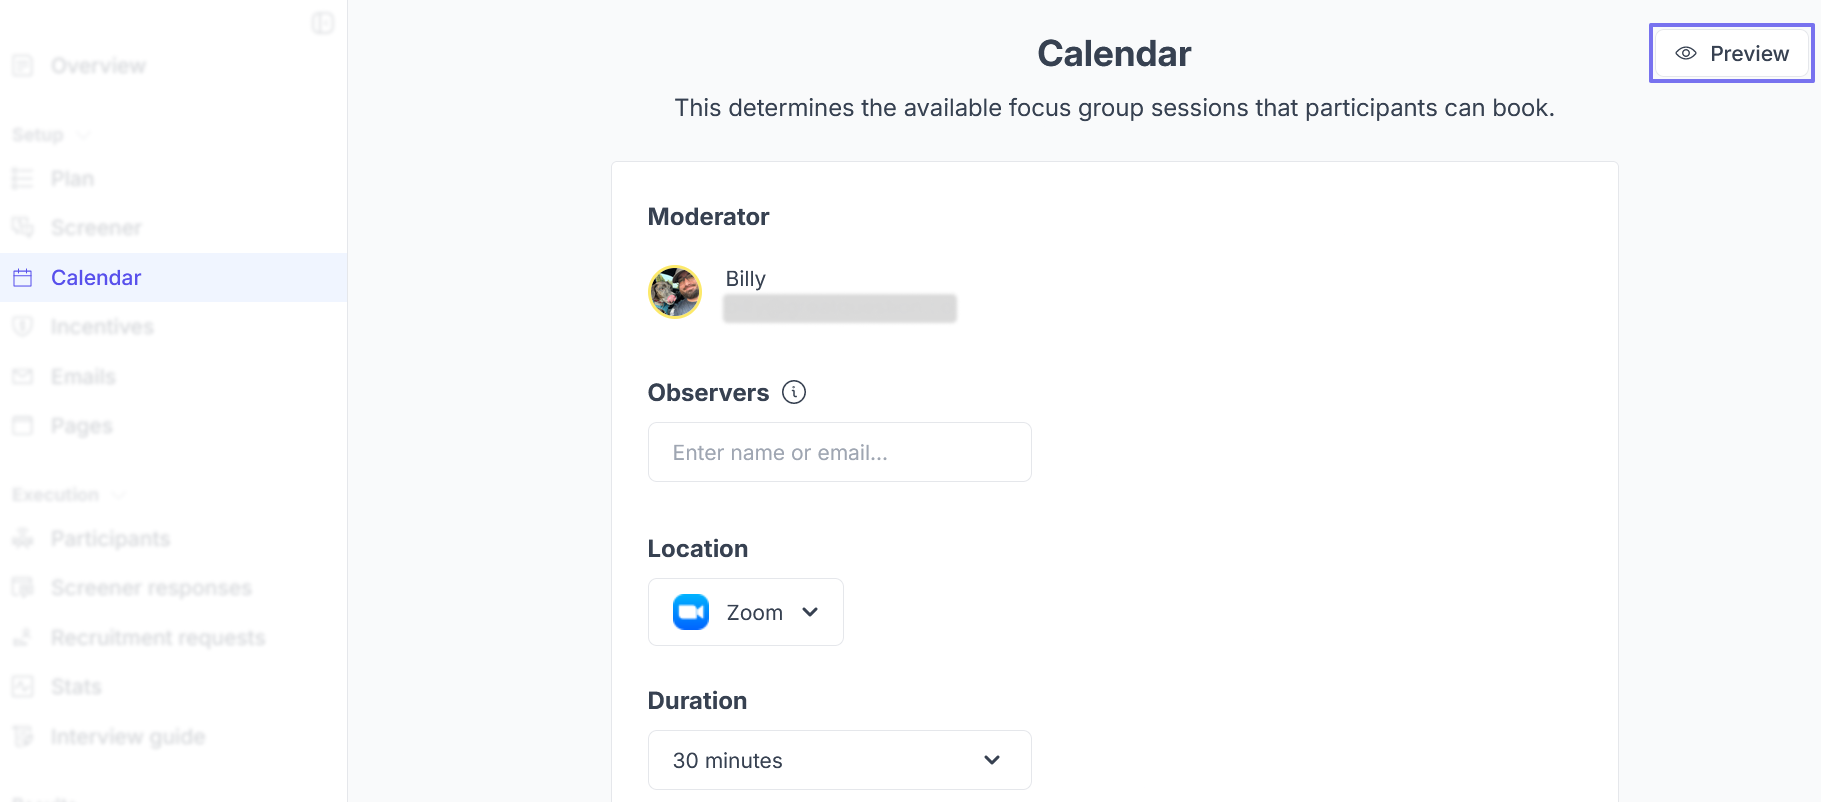
Calendar
Similar to the calendar step in the drafting phase above.
- Some features are a little different once published, but are noted in the linked guide below.
Button layout may be different depending on screen and window size
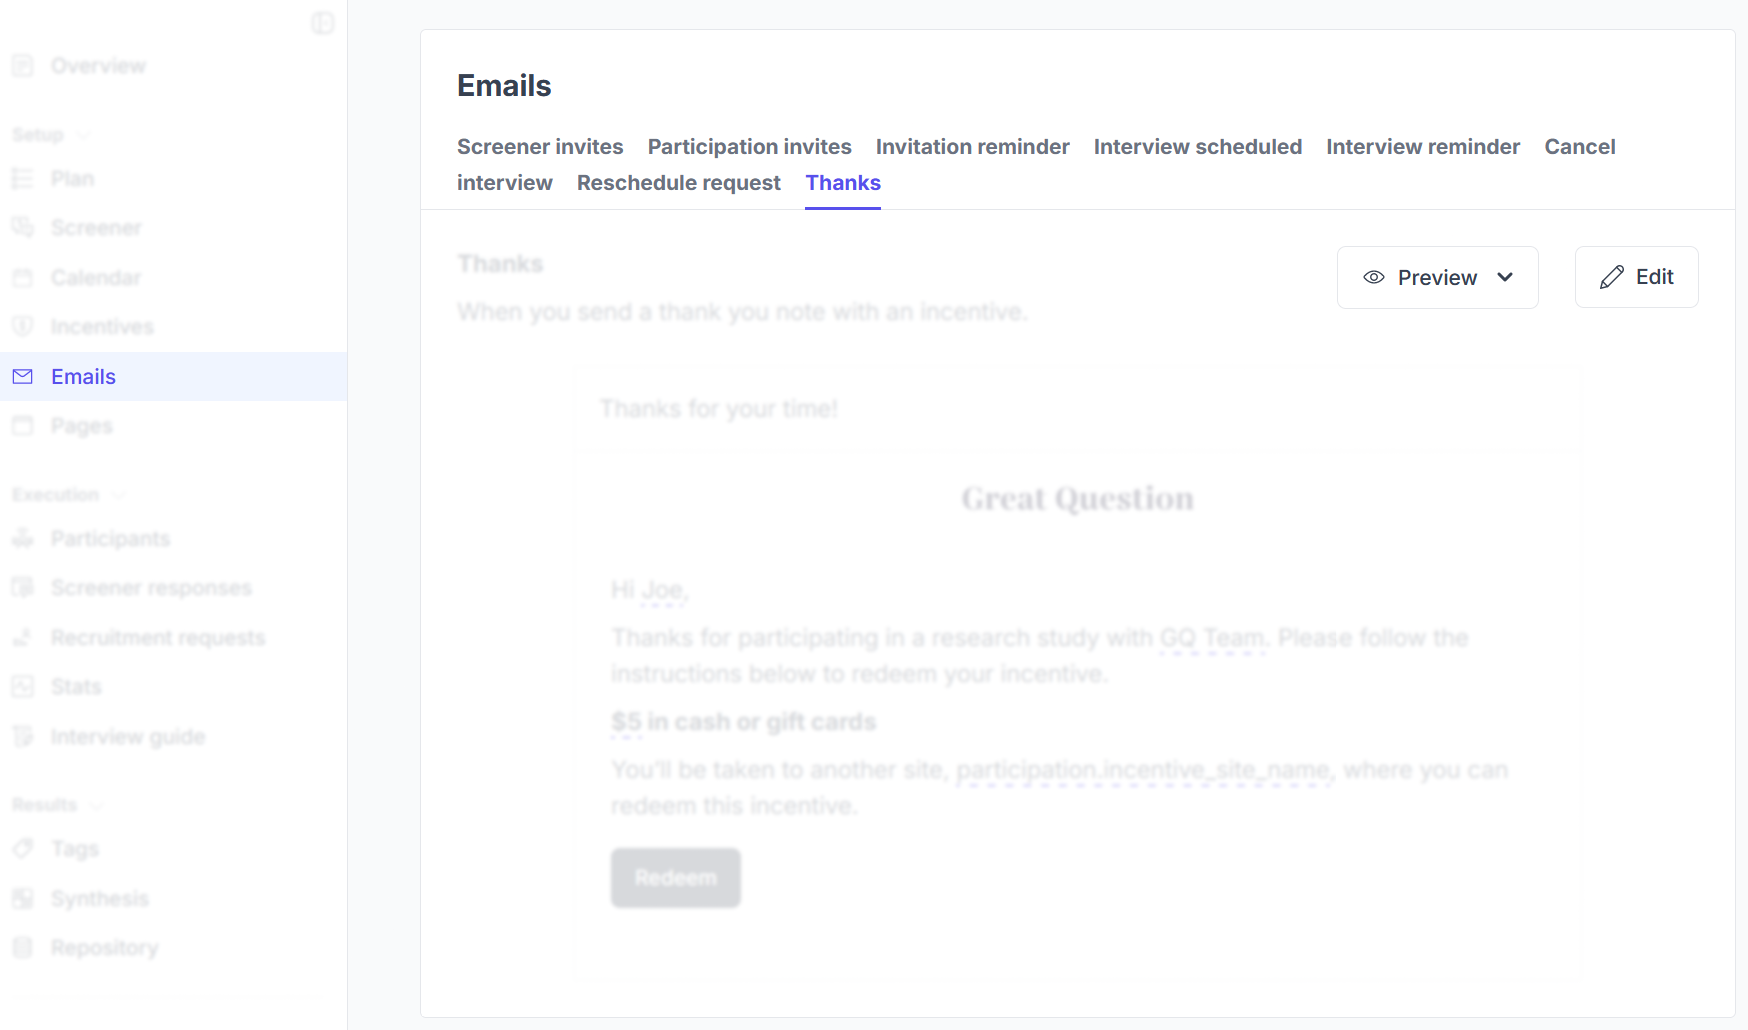
Emails
This is where all of your study's emails live, and is where you can preview and edit them.
Button layout may be different depending on screen and window size
Updates to the study email templates do not change the templates that are saved in Email templates.
Each email has the option to be changed from Branded HTML Layout to Rich Text Format (RTF) via the Email Design dropdown.
- At this time, this must be done for each email type, per study. There is no bulk option for all emails on a study, and no bulk option to apply across all studies for the account.
- The Email Design can also be changed per email as you are getting ready to send, vs changing the study's default.

Within invitation email templates, you will see study.live_stream_disclaimer. The disclaimer is in all default invitation email templates, but is only applied when your study has observer rooms enabled. It will read:
- "This session will be recorded and may be viewed by other researchers from Support Account. Please notify your researcher if you no longer wish for this session to be recorded."
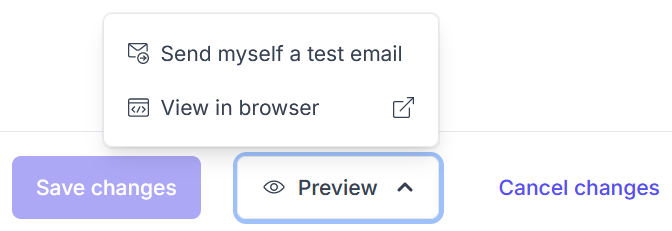
Preview your emails by clicking the Preview button, next to Save changes.
- If you have made any edits, save them first, and then preview. Only saved changes will show in the preview.
- Send myself a test email will send a preview email that will say
[Preview]in the subject line.- These emails do not contain active links for the CTA, and are for reviewing purposes only.
- The text "This email is intended for:..." is not included in the real emails that are sent to your participants.
- View in browser will open a preview in a new tab, and is used to review the body of the email.
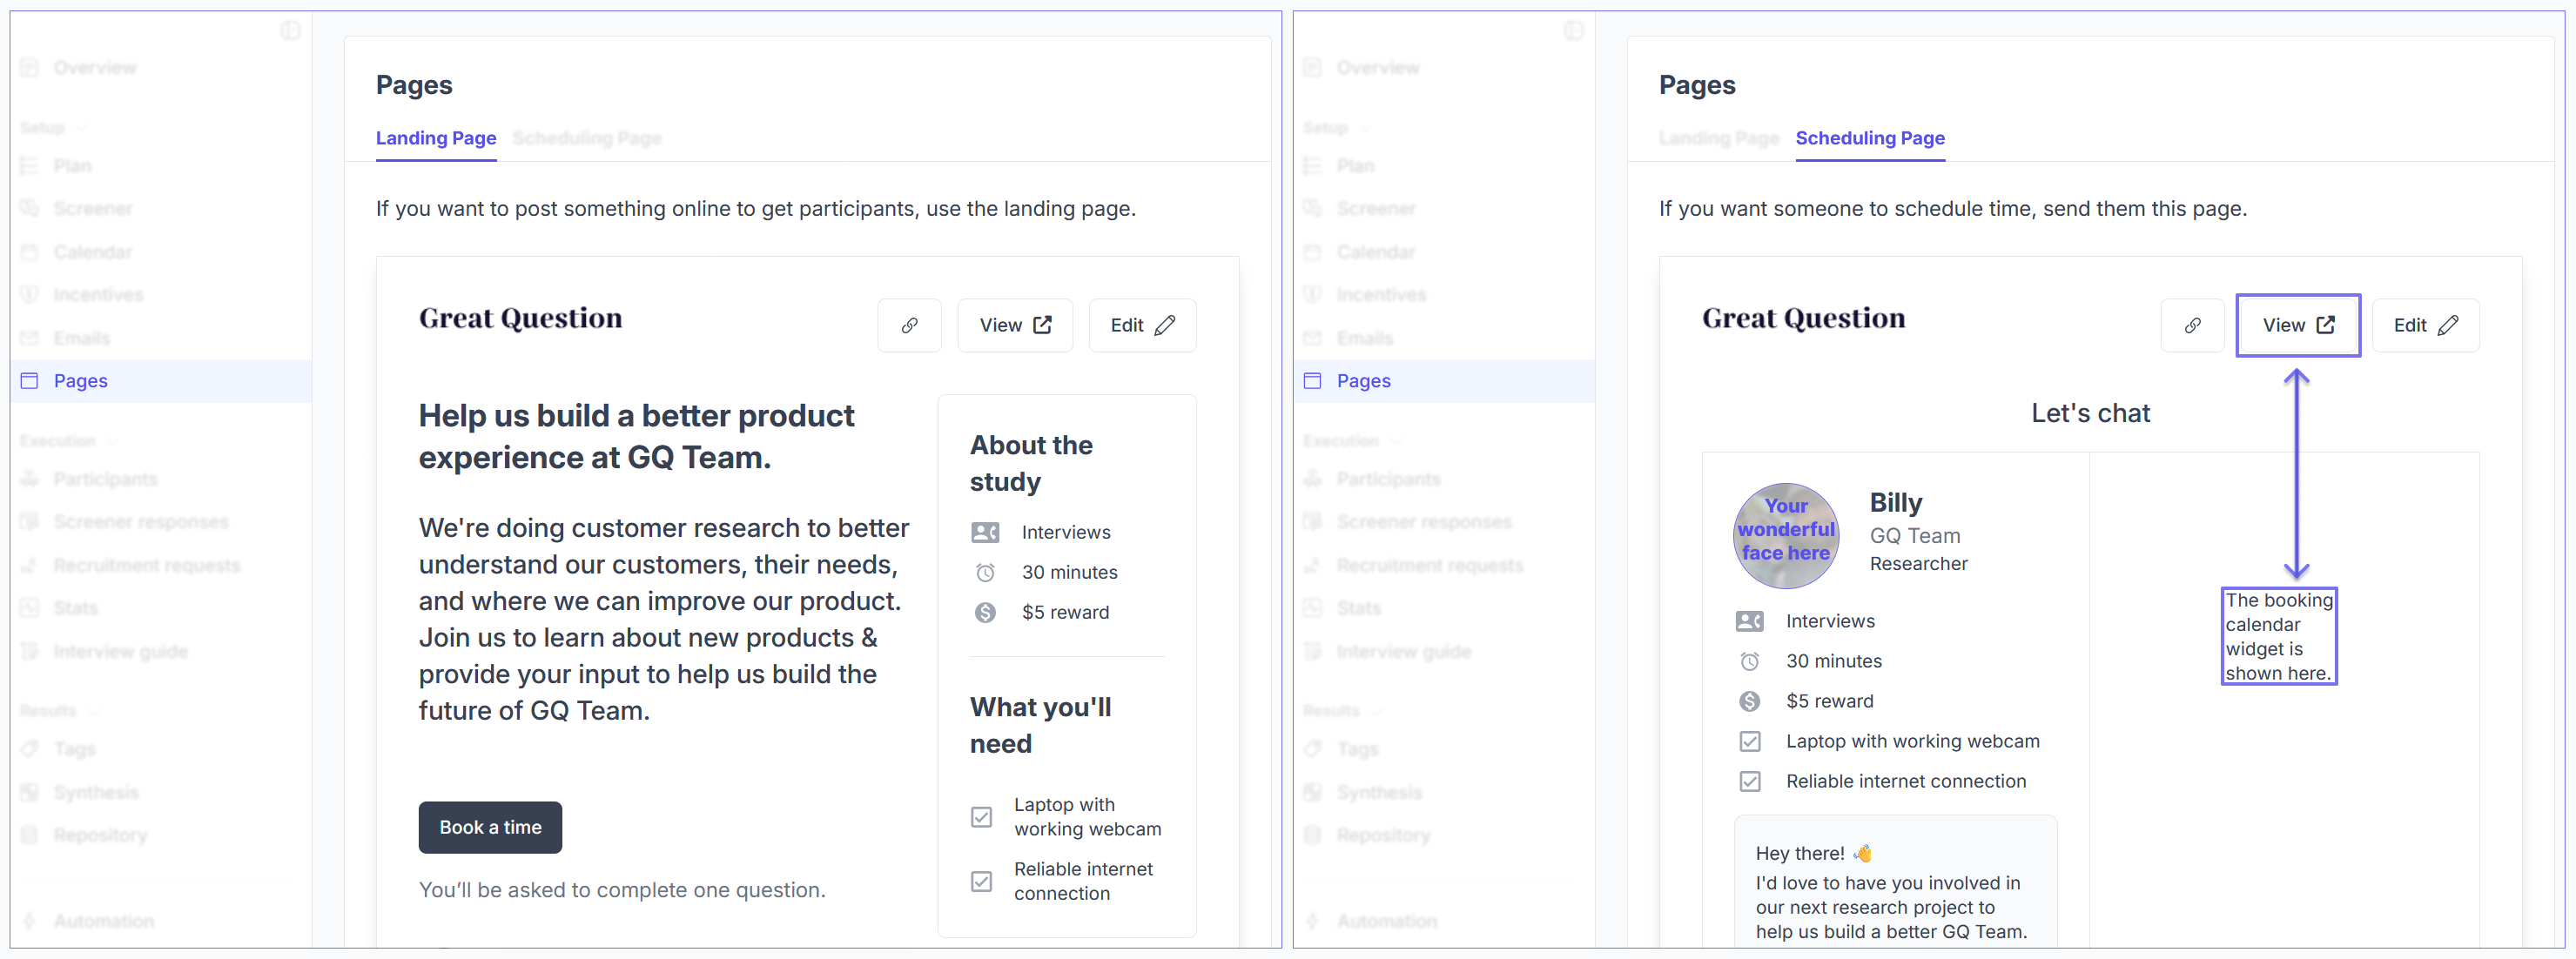
Pages
You can review and edit your landing and scheduling pages.
- Landing page is what participants will see when being invited to the study via email, or when sent the link via the Invite via link option.
- Scheduling page is what participants will see while going through the participation steps.
- You can also copy the link from this page and send it to participants to allow them to go straight to the scheduling page.
- The calendar/scheduling widget is not shown here, but will be shown to the participant via the live link, and can be reviewed by clicking the View button, once your calendar has been set up.
Each page has the ability to be edited by clicking the Edit button.
- Changes are saved when clicking Save changes in the top right corner of the edit view.
- At this time, the options with checkboxes cannot be edited, but can be hidden when unchecked.
Button layout may be different depending on screen and window size
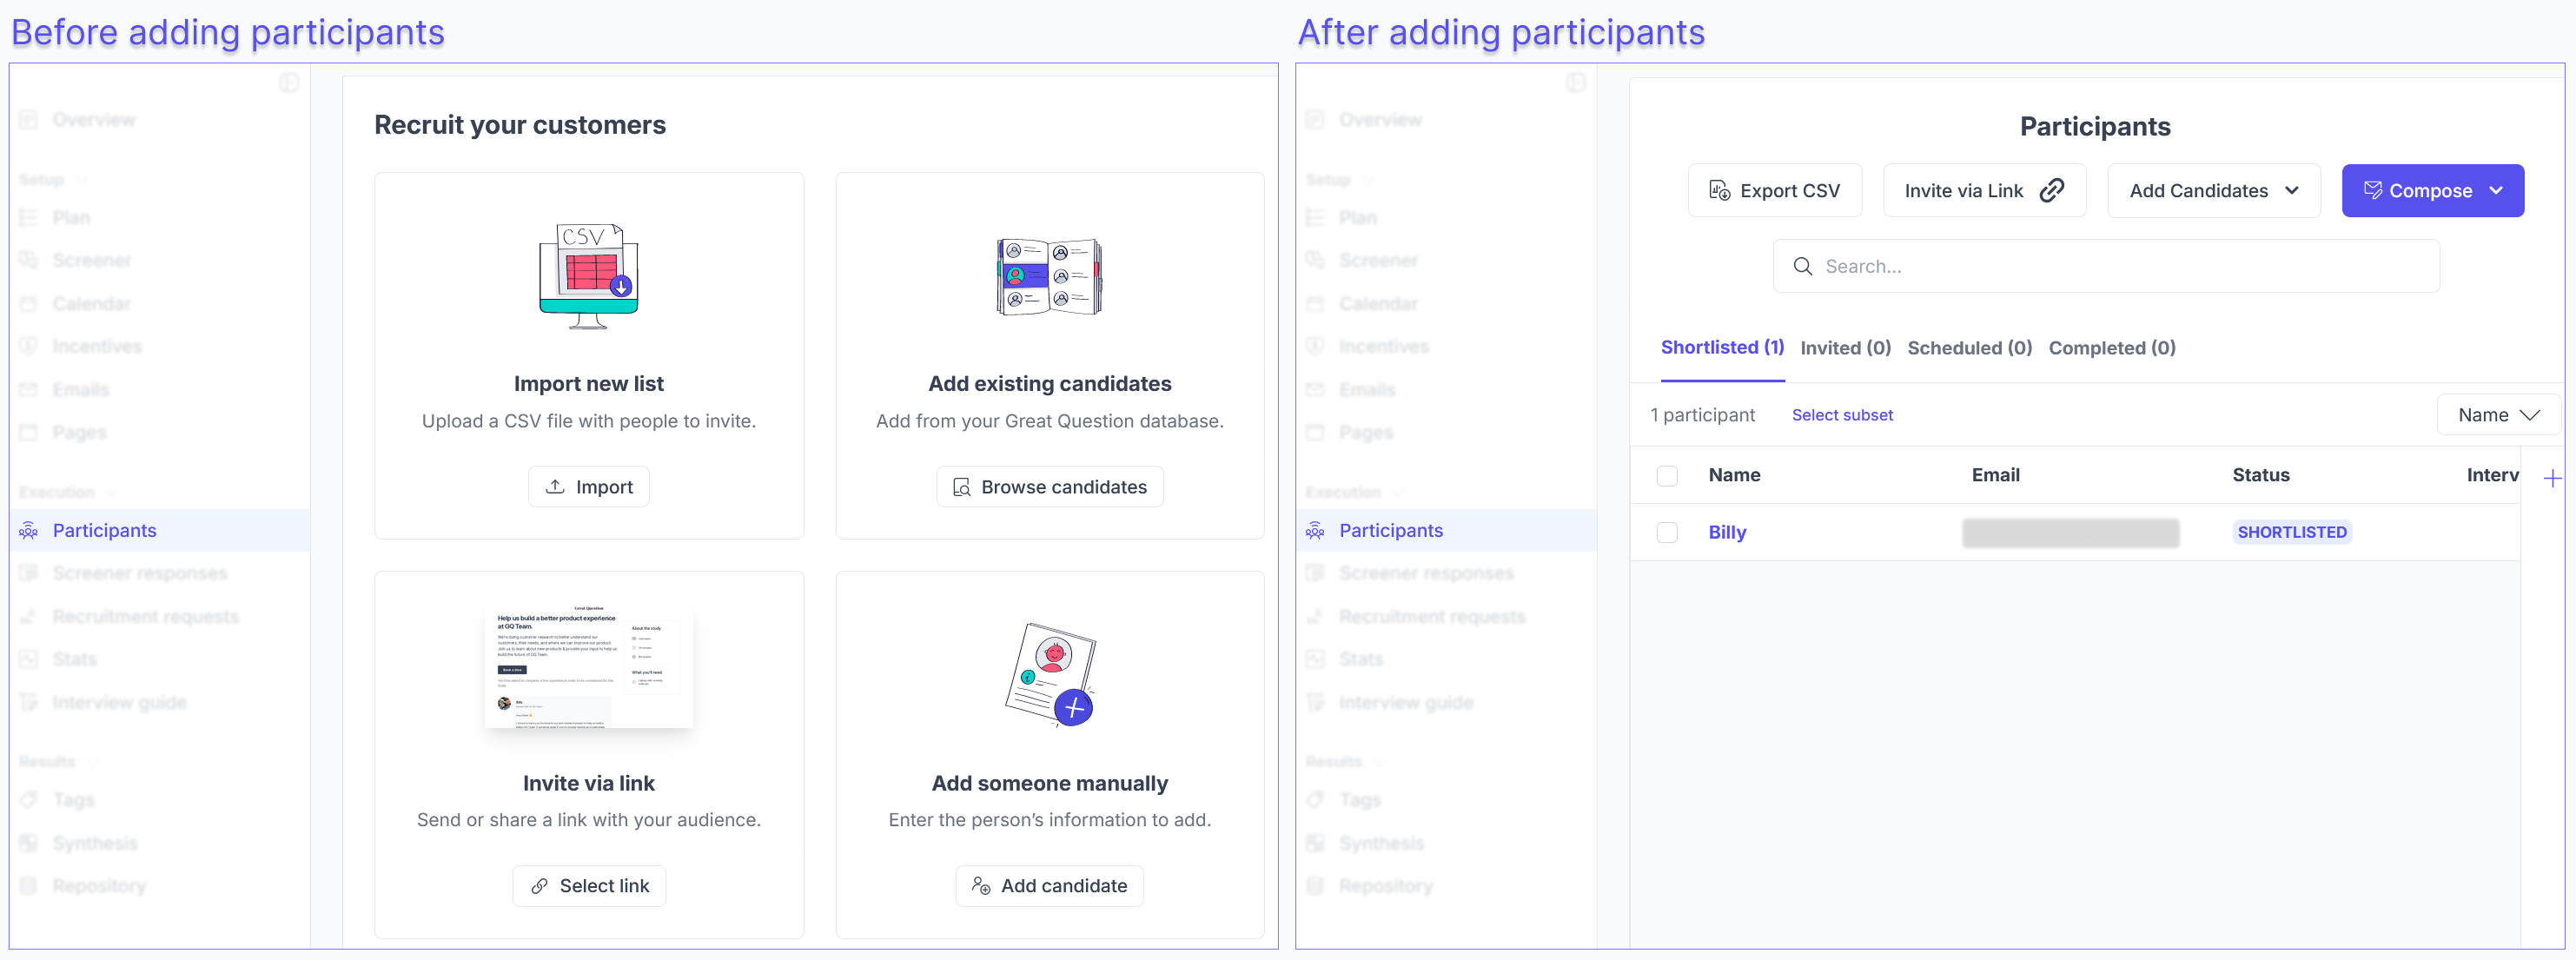
Participants
This is where you will be able to add candidates to your shortlist, manage your participants, and track their progress.
- The Participants tab is your default landing space when opening a study, but you can also get back to it by clicking on Participants.
- To start, you can add candidates to your shortlist via the three options that are shown.
- Or by using Participant Segments.
- The sub-tabs you see are based on what invitations have been sent and the status of the participants.
- Possible options are: Shortlisted, Sent screener, Applied, Invited, Scheduled, Completed, Canceled, No shows, and Removed.
- Example: Applied will show once a participant has completed a screener and has been move to the applied status.
Button layout may be different depending on screen and window size
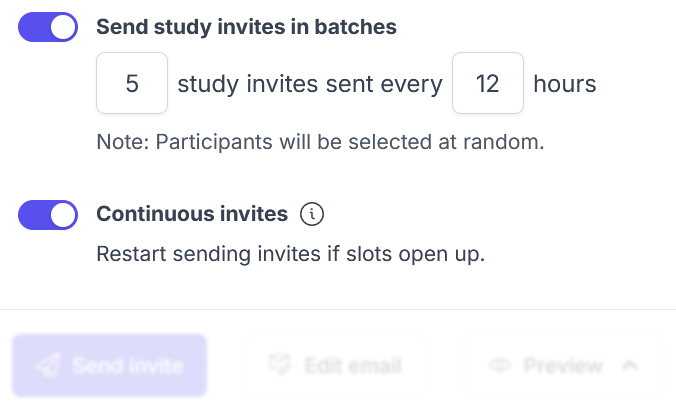
When sending emails to multiple participants, you can choose to send emails in batches and/or send continuous invites as slots become available.
- Batch invites send a set number of emails at a set interval, and will send them all out until the batch is complete, or until the all available slots are full.
- Example: You can choose to send 2 invites every 4 hours until the batch is complete, or the slots are full.
- These invites will not start again as slots become available if this setting is used on its own.
- Continuous invites send out emails based on the group of participants selected, and will send until all available slots are full. Once more slots become available, emails will start going out again to the remaining participants from the original selected group.
- Example: Invites will start going out again when slots become available due to participant limit updates, added calendar slots, interview cancelations, or updates to the Maximum scheduling notice.
- These options are not available for Screener Invites at this time. Only for sending Participant invites.
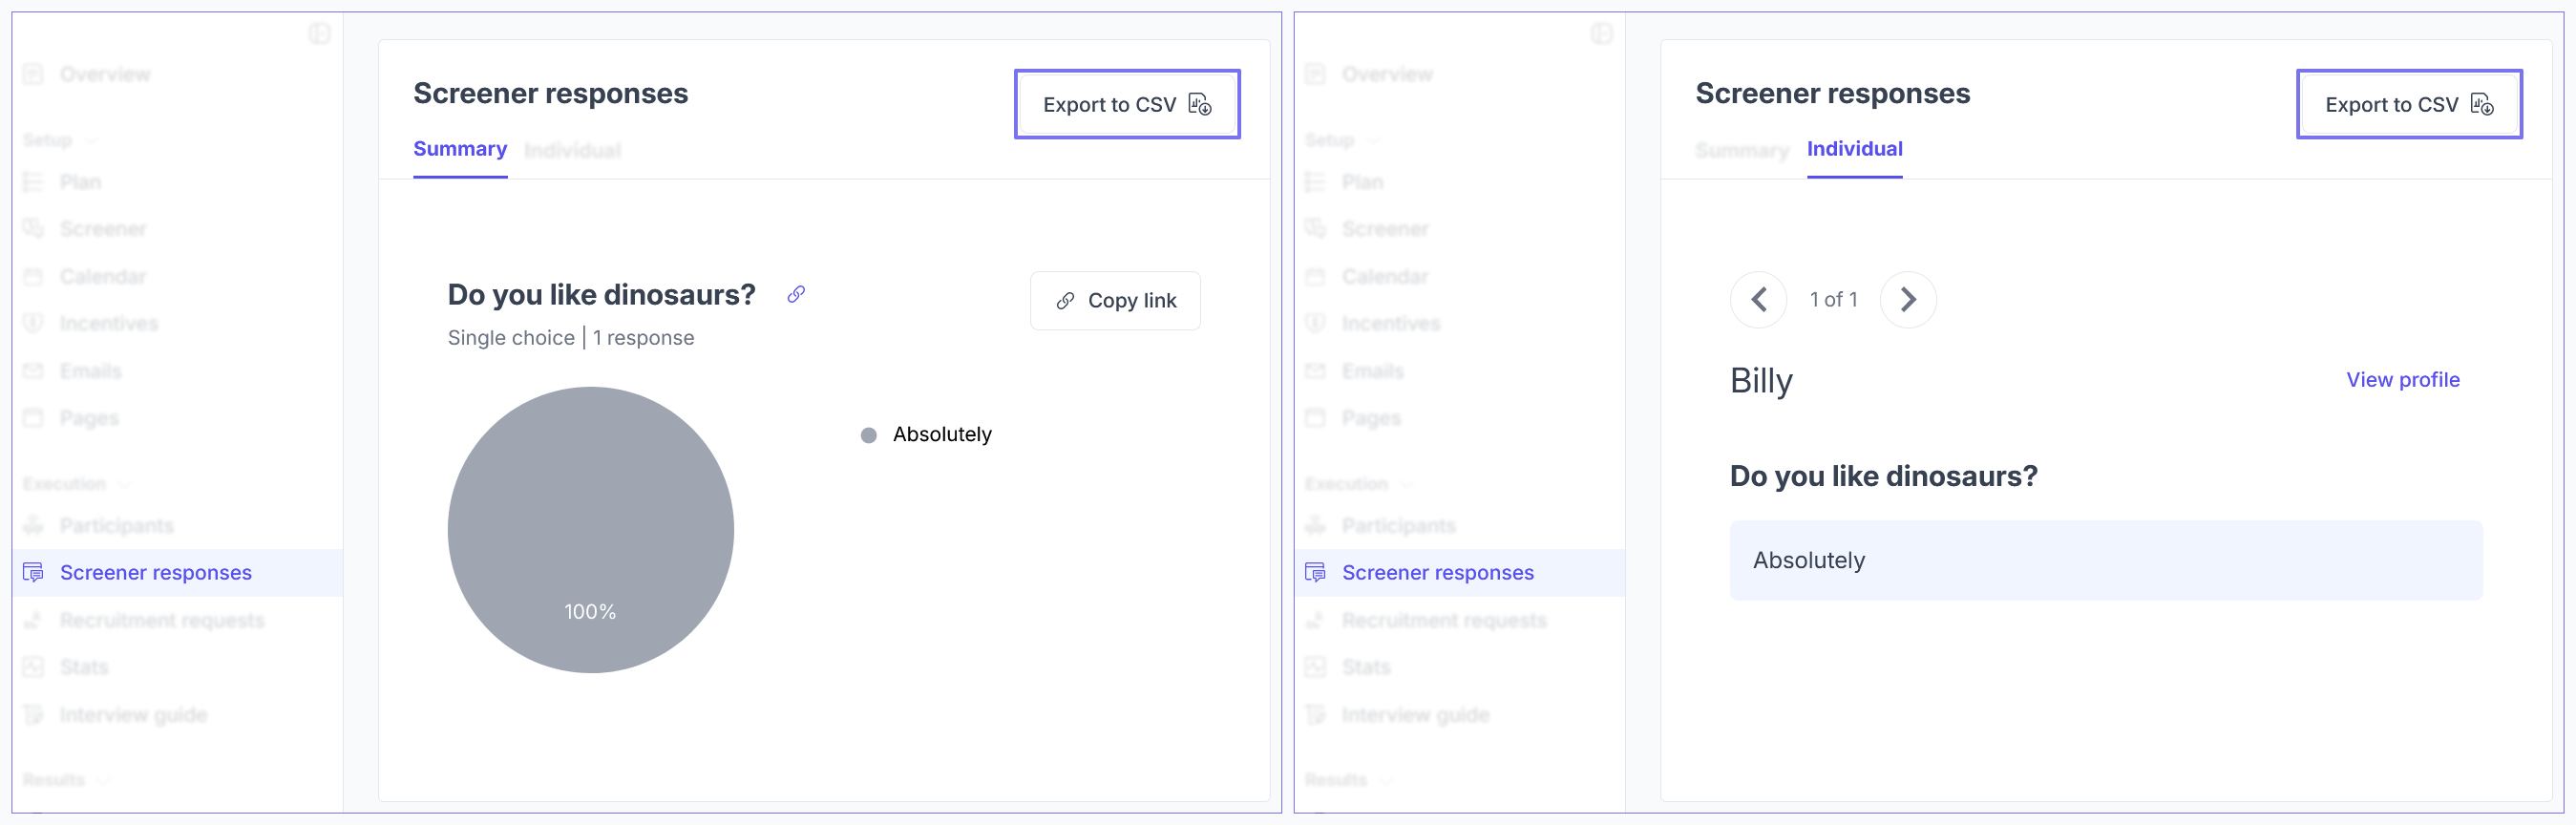
Screener Responses
Sub-tabs shown (once there are replies) are:
- Summary: results of participant responses
- Individual: individual participant responses (shown as participants submit screeners)
Button layout may be different depending on screen and window size
Use the Export to CSV button to export your participants' screener response data into a CSV file.
- The file will be sent to your device's downloads folder, or the folder that you have specified via your browser.
- The export includes the same data when clicked from either page.
Recruitment Requests
Review or setup new external participant requests here.
- Check out our External Participant Recruitment guide for more information on this feature and how to set it up.

Button layout may be different depending on screen and window size
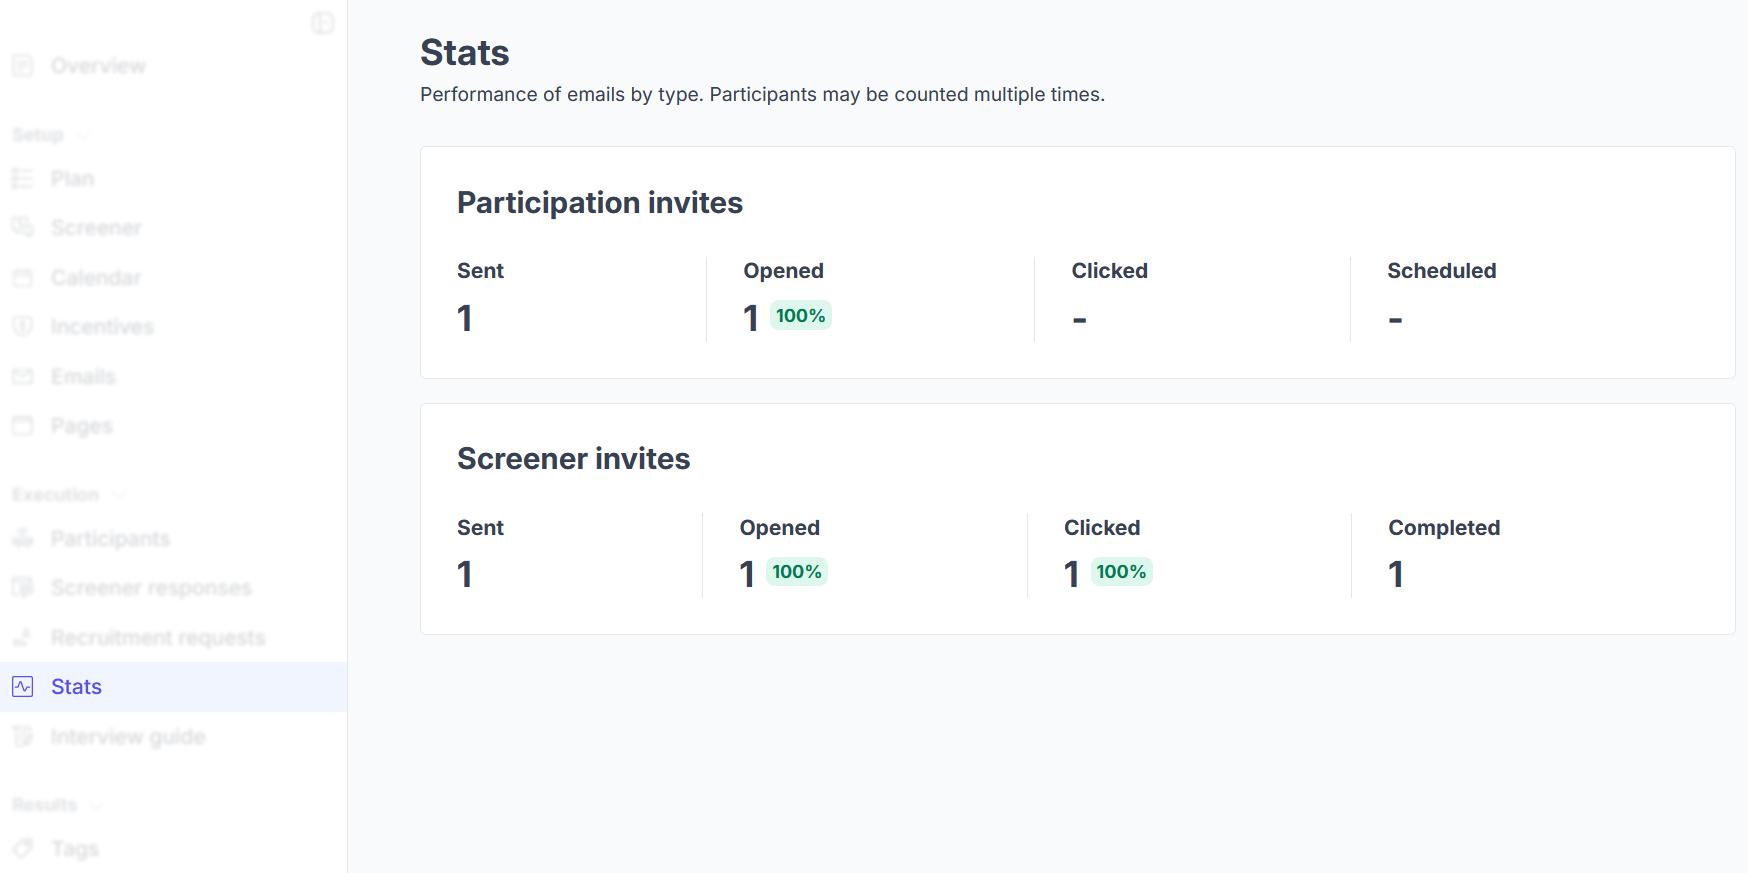
Stats
Review your study's email stats and performance.
- More information on this feature in our Recruitment Email Statistics guide.
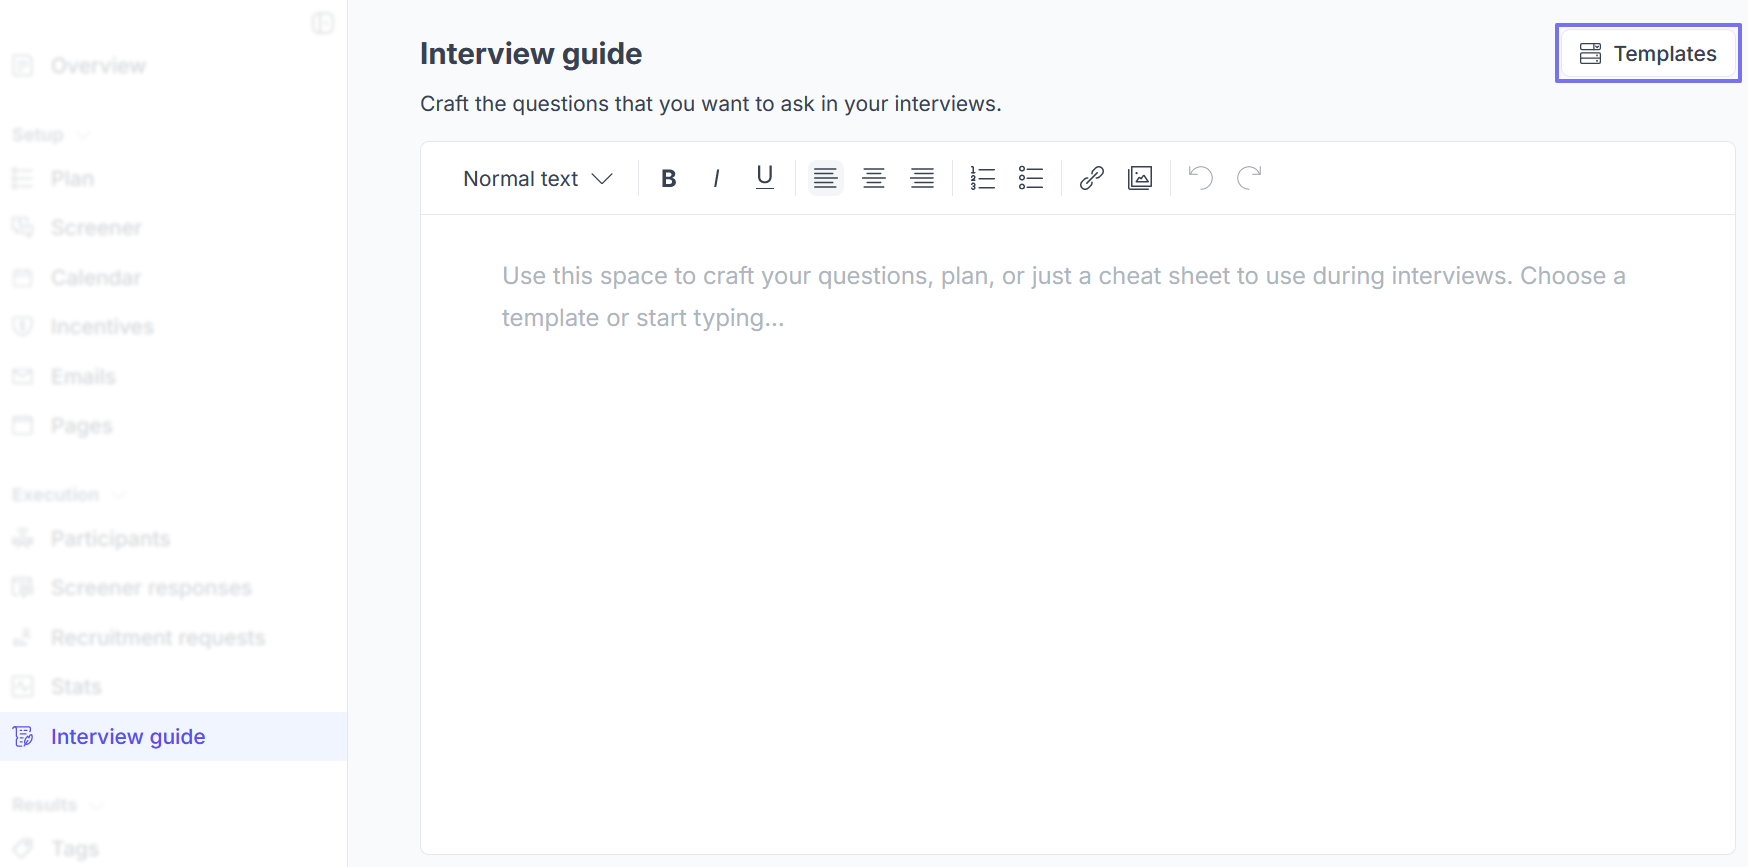
Interview Guide
Interview guides are a way to ensure that you and your team ask the same, relevant questions.
- Interview guide templates can also be selected if you already have some created.
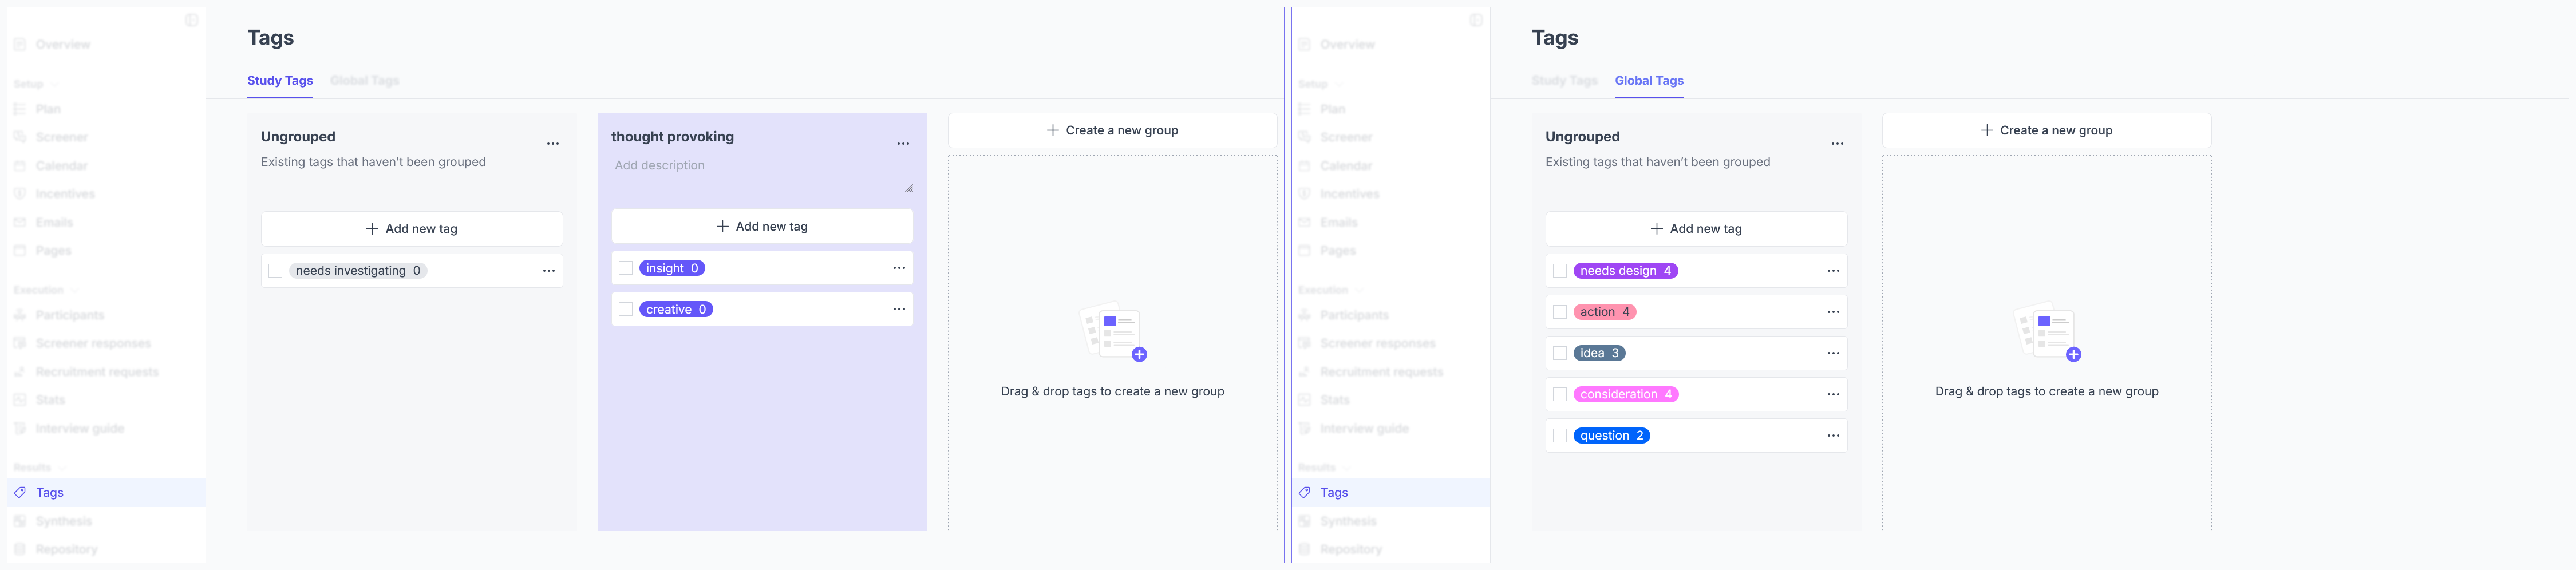
Tags
Create and manage study and global tags that apply to your study's research results.
- More on Tags in our All about managing tags guide.
Automations
Review the different options that you want to automatically happen, such as marking a participant as completed and sending them their incentive (if incentives are enabled).
- As seen in the example below, these options are disabled by default, except for Create an internal calendar event for new bookings, which is the same as an "Observer event", in situations where you have not added an observer yet, but still want a separate event to share.
- At this time, there is no automated reminder email for screener invites. Screener reminders must be sent manually by checking the user's name(s), clicking Compose, and then Resend screener...

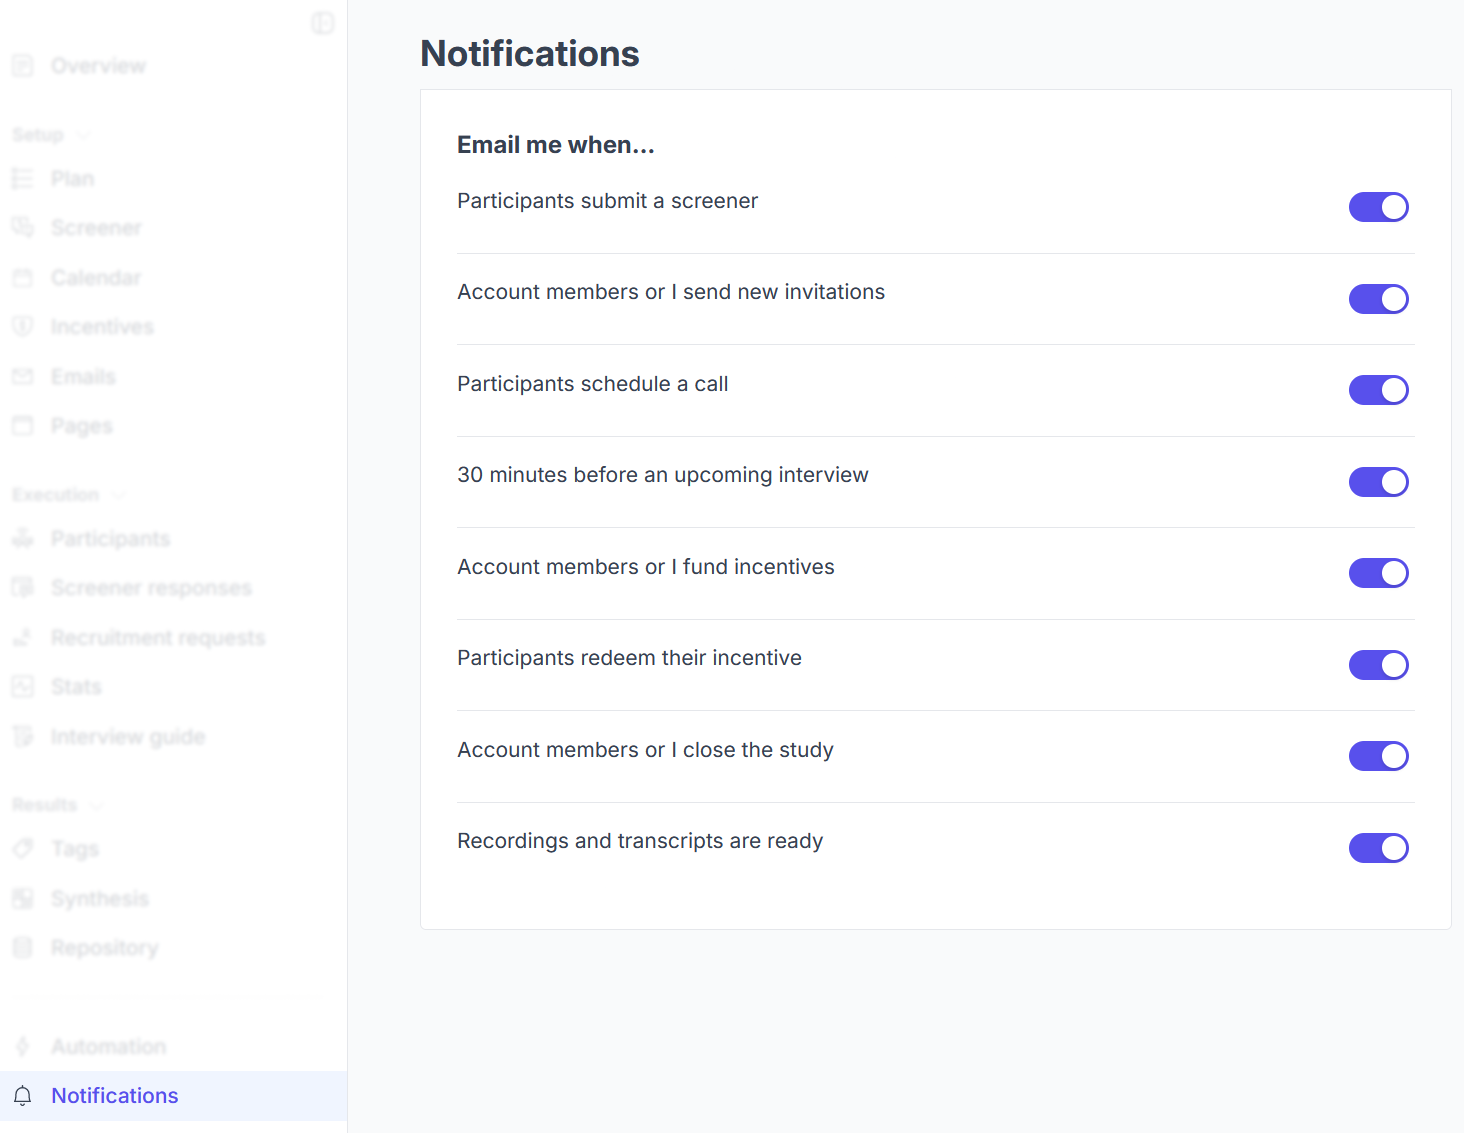
Notifications
Review the different notification options that you would like to receive via email.
- Some notifications only show depending on enabled settings, such as incentives and screeners.
- All options are enabled by default.
- If you have Slack integrated, you will see another section for these notifications as well.
Have Questions?
Please reach out to us in the chat or at [email protected]!