Table of Contents
Using the Great Question Scheduling Tool.

Scheduling
Learn how to set up, manage, and troubleshoot your scheduling for Customer Interviews.
What is Scheduling?
The Scheduling tool helps you manage and share your availability for Customer Interviews. It ensures participants can only book times that fit your schedule and integrates directly with your calendar provider.
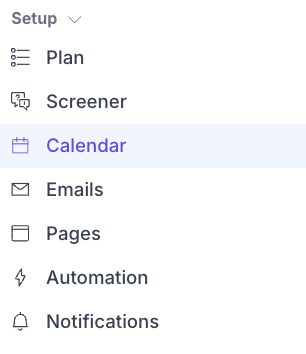
You’ll find the scheduling setup under the Calendar tab in your study.
How to Set Up Your Scheduling
Step 1: Connect and Select Your Calendar
- Go to Settings → Integrations and connect your calendar provider.
- Only one provider (Google Workspace or Microsoft) can be connected at a time.
- Once connected, open your study → go to the Calendar tab.
- Under Attendees, click your name beneath “Moderator” and select your desired calendar.

Step 2: Adjust the Calendar View
Adjusting the view changes how the calendar appears on this page. You can also preview the calendar from a participant’s perspective to confirm the setup after entering availability.
- Click View in the top-right corner of the Calendar tab.
- Choose how your calendar displays:
- Days and times: Set visible hours and select weekdays only (Mon–Fri) or a full week.
- Display options: Toggle on/off moderator or observer events, and choose whether to show busy or free events.
- How calendar events are treated in the platform:
- Free:
- Free
- Tentative
- Busy:
- Busy
- Working elsewhere
- Out of office
- Free:
Step 3: Configure Your Scheduling Preferences and Availability
- Event details
- Duration: how long the interview should take. Available in 15 minute increments.
- Location: where the interview will take place. Options available are Zoom, Google Meet, Microsoft Teams, Webex, custom links, or In Person.
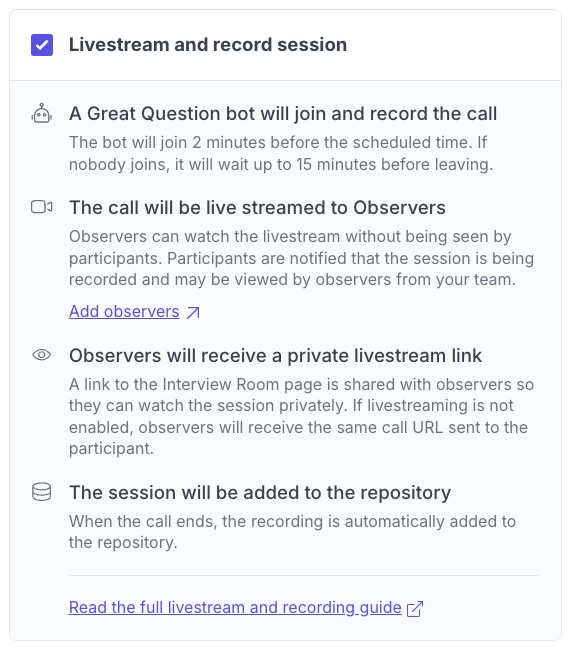
- Livestream: Livestream allows your team to sit in on live interviews without being in the interview room, relieving some of that pressure your participants may sometimes feel when there are six other faces on the call. The Great Question bot will join your call to livestream the interview for your observers.
- Attendees
- Scheduling styles:
- Standard 1:1 → one moderator, one participant.
- Collective → multiple moderators, one participant.
- Round Robin → automatically rotate moderators by availability or fairness.
- Moderator
- Designate who should be the moderator of the interviews.
- When clicking into the moderator, please select the calendar events should appear on.
By default, the moderator is the owner of the study, for standard 1:1 studies. For Collective studies, the study owner is the primary moderator. For Round Robin studies, the study owner will be a moderator, and the first in the list.
- Moderator scheduling conflicts
- Prevent double bookings in the same study.
- Prevent double bookings across other studies.
- Prevent double bookings across external calendar events.
- Observers
- If livestream is enabled, the observers you add here will be sent a calendar event with the link to the Observer Room.
- Scheduling styles:
- Availability
- Scheduling dates:
- Enter date range for when interviews should be conducted.
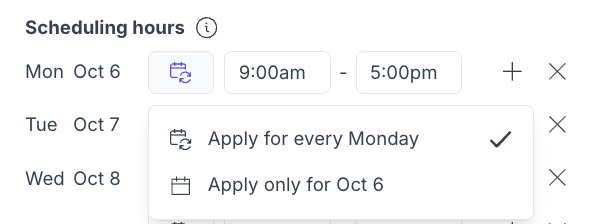
- Scheduling hours:
- Enter the availability hours within the date range for when interviews should be conducted.
- Click the calendar icon to select whether this availability should apply to that specific day every week or that specific date:
- Scheduling dates:
- Timezone
- Set the timezone for which you are setting up availability for.
- Participants will see this availability in their local timezone.
- Set the timezone for which you are setting up availability for.
- Additional options
- Booking limits:
- Decide whether they should be daily or weekly booking limits.
- Booking limits:
- Buffer between events
- Decide whether there needs to be a buffer between your calendar events and scheduled sessions. Buffer applies to before and after the event.
- Minimum & maximum scheduling notices
- Decide whether there needs to be a restriction on how soon or how late a participant can book an interview.
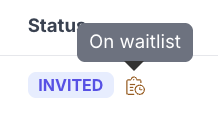
- Allow waitlists & time proposals
- For waitlists, If no more time slots are available, participants can join a waitlist and can be manually invited to join if time slots open up.
- If the time slots available do not work for your participants, they can submit a time proposal for review.
- Further breakdown on how time proposals work:
- Moderators receive an email when a participant submits a proposal.
- Click the link in the email to review and accept in the participant’s profile.
- Once a proposal expires, it can no longer be accepted, but it can be rejected.
- When a participant sends a time proposal, an icon appears beside their name.

Step 4: Review Your Setup and Preview the Participant View
- Click Participant preview to see what your participants will experience when booking.
- Confirm available times, time zones, and session formatting.
- Adjust settings if any times appear incorrect or missing.
How to Manage Your Scheduling
How to Schedule Interviews
- To send a scheduling request, click on the checkbox next to the participant's name, click on Compose, and then select Participation invite.
- To manual schedule a participant, click on the checkbox next to the participant's name, click Mark as, and then Mark as Scheduled.
- You will be prompted to pick a date and time and then send confirmation.
- To send a rescheduling request, click on the checkbox next to the participant's name in the Scheduled tab, click on Reschedule, and then click on Send reschedule request.
How to Edit Interviews
You can adjust several settings for individual interviews. To edit a booking, click on the scheduled participant’s name. In the slide-out, scroll down to Booking details and select Edit booking to make changes.

This is what you can update:
- Date
- Time
- Duration
- Location
- Moderators
- Add or removing moderators
- Livestream
- Enabling or disabling feature
- Observers
- Add or removing observers
- These edits only apply to the specific interview you are looking at.
How to Change the Moderator
You can update the moderator for an individual interview at any time. In the Participants list, click the current moderator’s name in the same row as the participant. Select or type the name of the new moderator, then click Confirm to apply the change.
How to Use Troubleshoot Mode
Troubleshoot mode provides clarity on unavailable time slots and allows you to resolve time slot issues. Troubleshoot mode simply lists all time slots (including those that are unavailable) and provides details on why the time slot is unavailable.
When viewing your calendar, there will an option to click on Troubleshoot, and it will take you to the participant's preview.

When you select a time slot that isn't available, a slide out will appear and provide an explanation of all the reasons why that time slot is unavailable:
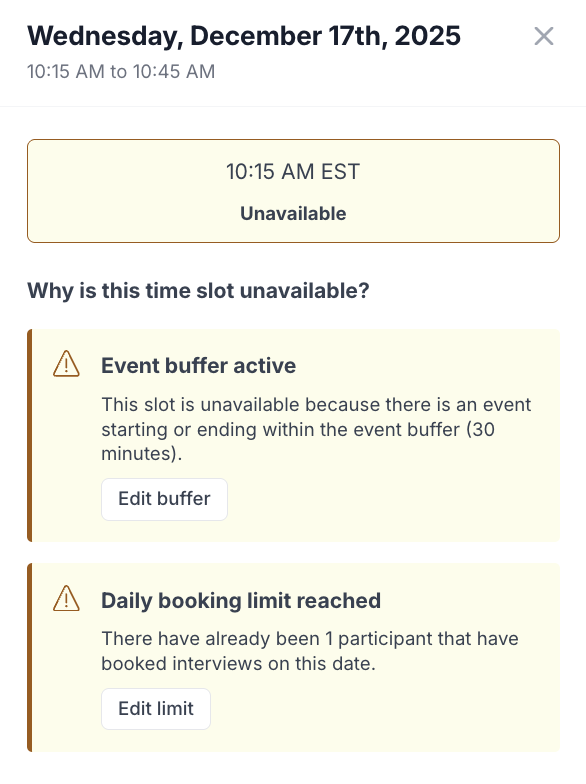
You will be presented with actions to resolve time slot availability. Once you resolve the time slot issue, you can click on Done to finish the process. Here are the all reasons your time slot may not be available:
- Duration is too long for the available time for that day
- Total participant limit has been reached
- Weekly booking limit has been reached
- Daily booking limit has been reached
- Maximum scheduling notice active
- Minimum scheduling notice active
- Event buffer active
- Outside of scheduling dates
- Outside of scheduling hours
- Moderator has a conflict
How to Troubleshoot Scheduling
Issue | What's Happening | How to Fix It |
Session duration doesn’t fit | The interview duration is longer than the available time on that day | Shorten the Duration under Event details or expand availability hours |
No available time slots | Booking limits, buffers, notices, or conflicts are blocking availability | Open Troubleshoot mode in Participant preview to see exactly which rule is blocking slots |
Daily or weekly booking limit reached | The study has hit its configured booking cap | Increase or remove limits under Additional options → Booking limits |
Minimum or maximum scheduling notice blocking bookings | Participants are trying to book too soon or too far in advance | Adjust Minimum or Maximum scheduling notice settings |
Buffer between events is too large | Buffer time is preventing adjacent sessions | Reduce or remove buffers under Additional options → Buffer between events |
Moderator has calendar conflicts | The moderator’s connected calendar shows busy events | Check the connected Google or Microsoft calendar and resolve conflicts |
Participant limit reached | The total allowed participants for the study has been met | Increase the Participant limit under Plan or remove completed sessions |
Time zone mismatch | Availability is set in a different time zone than expected | Confirm the time zone under Availability and review using Participant preview |
Participant can’t propose a new time | Time proposals are disabled or expired | Enable Allow time proposals or manually reschedule the session |
Still need help?
Reach out to us anytime in the app or email us at [email protected]!